Connecting a shared drive and file sensor to Home Assistant Green.
Thursday, July 3, 2025 at 09:08:38
The Home Assistant Green is just a Linux boxen running a containerized version of Home Assistant under a minimalist operating system. Technically, it should be able to do anything that the kernal supports, and one of those things is connecting to a shared drive.
I have a Raspberry Pi that has an I2C air pressure sensor connected to it. Once a minute, a cronjob reads that sensor and writes it to a location on the network - in this case a shared folder on a NFS-connected Synology drive. That file is then available for other programs to use - primarily my own garbage php frontend, and Cacti. Since Home Assistant has a nicer frontend than Cacti, I’d also like to present it there.
There’s a lot of conflicting information on how to do this online, and again - the documentation HA provides is just someone’s thought process. It’s actually fairly easy once you figure it out, however.
For this exercise, I’m using my older NFS connected Synology NAS. It has older versions of NFS opened up to the entire network. I’m not going to go into how to do that since I’m running a pre 5.0 variant, but if you want to do this for yourself make sure you understand how the NFS process works, and that you can connect to it. I’m also going to assume that you know how to access the configuration files in your system.
In order to create this new sensor, there are several steps:
1: Create the NFS share on your target device.
2: Create the share in Home Assistant
3: Allow HA to access the share
4: Create the sensor
1: We’ve already covered this, you need to make sure you can do this on your own.
2: Creating a share in Home Assistant is much easier than it used to be. Since a version in 2023, the system now has this builtin to the GUI. To access this, go to:
settings (sidebar gear icon)  > system
     > storage > add network storage
You’ll get a window that looks like this:
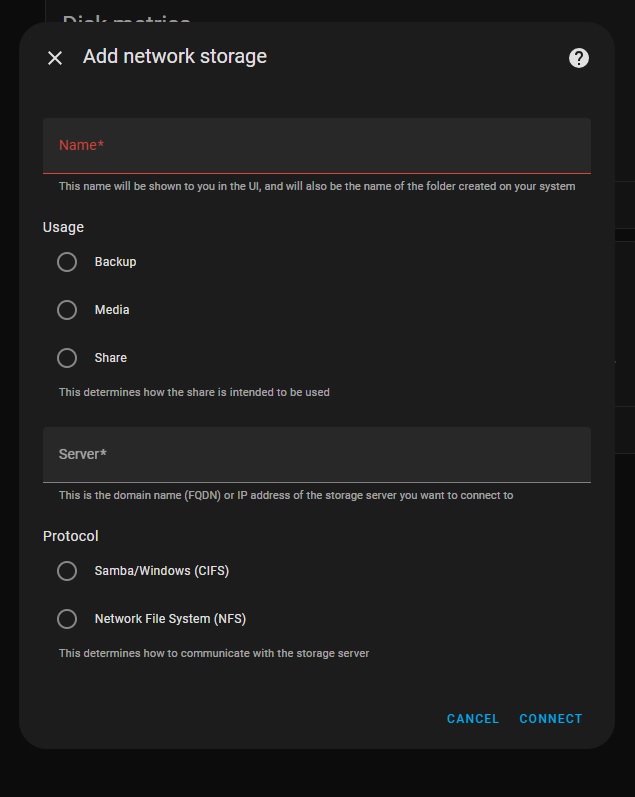
Give your share a name. I’m going to call my share raspi, because it was originally set up to share files between multiple SBCs on my network. This is the name that the HA process will use when you access it, so make it meaningful, one word, and as short as you can so you don’t have to type a lot of long things. Or, do whatever you like, but I’d suggest keeping it to a single, no-space word. I don’t know how HA handles spaces here.
The next section is entitled “Useage” - this is kind of misleading, as the only thing this does is identify where the share will be located under the HA process. For example, if you choose “share,” your file path will be “/share/raspi” - it’s more of a human readable delineation than an actual “thou shalt only put thine backup here” type of thing. I chose share just because why not.
Next, choose the type of connection you want to make, NFS or CIFS. CIFS is just a fancy name for the type of shares that a Windows system uses, while NFS is the preferred Linux connection method. There’s plenty of info out there on what these acronyms mean if you’re so inclined.
CIFS usually requires a user/pass/domain type thing (Think your windows login and workgroup) whereas NFS can just operate based on IP address limiting. Since I’m using NFS, I chose that and entered my share:
<ip address>:/volume1/raspi
ip address is self explanatory, it’s the address of my share. Follow this with a colon, and the entire path of the share - Synology units call each volume by it’s numeric name, so “volume1, volume2,” etc. My share is on the first disk and is called raspi, which is the same as the name I gave it for home assistant. I’m calling my share on HA and on the remote share the same thing, but you don’t have to. Call it whatever you like within the Home Assistant system, as long as you’re mapped to the correct place on the remote share.
Assuming all is correct, hit connect and if right, it should just do it. Now, on the storage page you should see your new connection as ipaddr/path/to/share. It won’t say this, but now home assistant has mapped /share/raspi to this shared location on your network.
3: You’ll need to allow the Home Assistant container access to these foreign locations, and that involves editing your configuration.yaml file. So load up the file editor add-on (or install it) and navigate to your configuration file. You’ll need to add a new block to your config - I like to do this right before my sensor: block.
homeassistant:
  allowlist_external_dirs:
    - '/share/raspi
    - '/share/raspi/hass'
Note the single quotes!
What we’re doing here is adding a block called homeassistant: and using the allowlist directive to tell HA it can indeed access these locations that aren’t it’s native systems. I’ve gone ahead and added both the directory I need to access, as well as a directory I can write to later that’s specifically set up for this machine. I don’t know if top-level permissions are inherited, so I just added each individual directory on it’s own. This is pretty much the same format as all other directives in the yaml file, so just follow others if you’re unsure. Spacing is important here!
In my example, raspi is the directory where all the sensor values I want get written, and hass is a directory just for this machine that I can write to and retrieve things from. Create directories as you need them, you don’t need to make extras if you’re not going to use them.
Once you’ve added the directories, use the configuration checker under developer tools to make sure your config is good, then restart the HA process. Allow some time for everything to come back up and populate the new fields. The share seems to persist through this, so you should be good to leave it alone.
4: To create a sensor, you’ll need the file sensor with the “file” integration. To do this:
setting (gear icon) > devices &services > add integration
     > file > set up a file based sensor
Search for file in the integrations list
You’ll get something that looks like this:
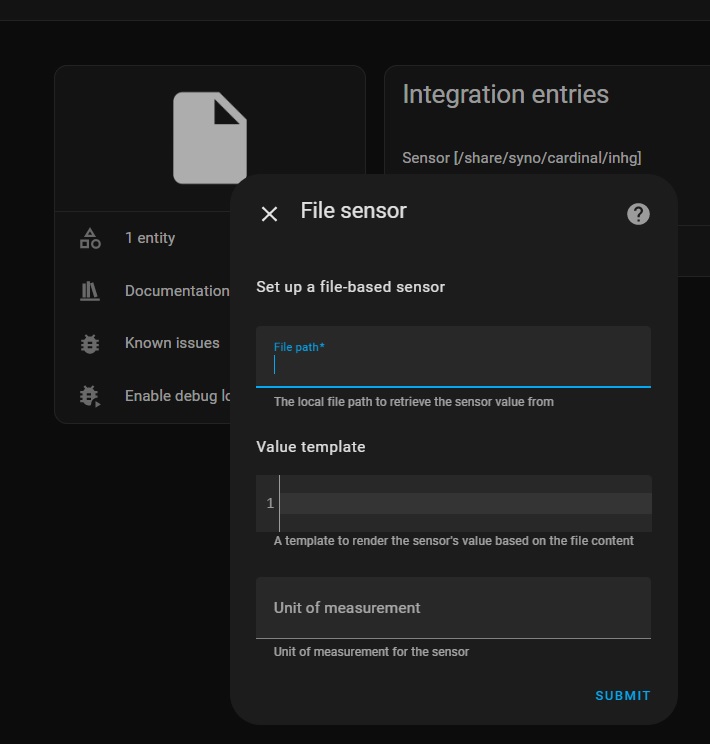
Fill out the form with your sensor (entity) information.
File path is the HA path you set up, in this example it would be:
/share/raspi/airpress.txt
where airpress.txt is the file we want to read. You’ll need to call this whatever you’re trying to read. This should be a single value with no other stuff attached.
Template is the yaml code you want to use to process the value you read. Since my value is already what I want, I left it blank. You may need to change that - yaml code is beyond the scope of this document.
Unit of measurement is just that. It’s just an identifier and only means something for you. In my case, I chose inHg since it’s air pressure. You could call it chickens/hour, °Quackenbush, or “Bob.” Whatever you like. Hit submit, and it should create a new entity creatively called “file.” Click on the entities link, then click the new “file” entity, and edit so the name means something using the gear icon.
You now have a new sensor populated by a value that you can manipulate like any other sensor.