Welcome to visitors from the Home Assistant Community, and thank you for visiting. This is a personal blog where I primarily do older equipment repair/rebuild, but I sometimes will pick up a piece like the one below. There are a few other stories related to HA in the archives, click on the “Automation” link in the categories section of the sidebar to get a listing of everything so far.
Recently, I tore down an Ikea Inspelning smart plug in order to see if it was able to be modified to be always on. It was, and you can find that teardown and analysis here.
Well, for some reason, Ikea decided to abandon the tested and working ZigBee protocol plugs and go to a Matter-based mess. Why? I have no idea save that it could potentially allow them to put devices on WiFi later - or perhaps they just jumped on the latest Thing like many companies do without any soul-searching as to if this is a good idea.
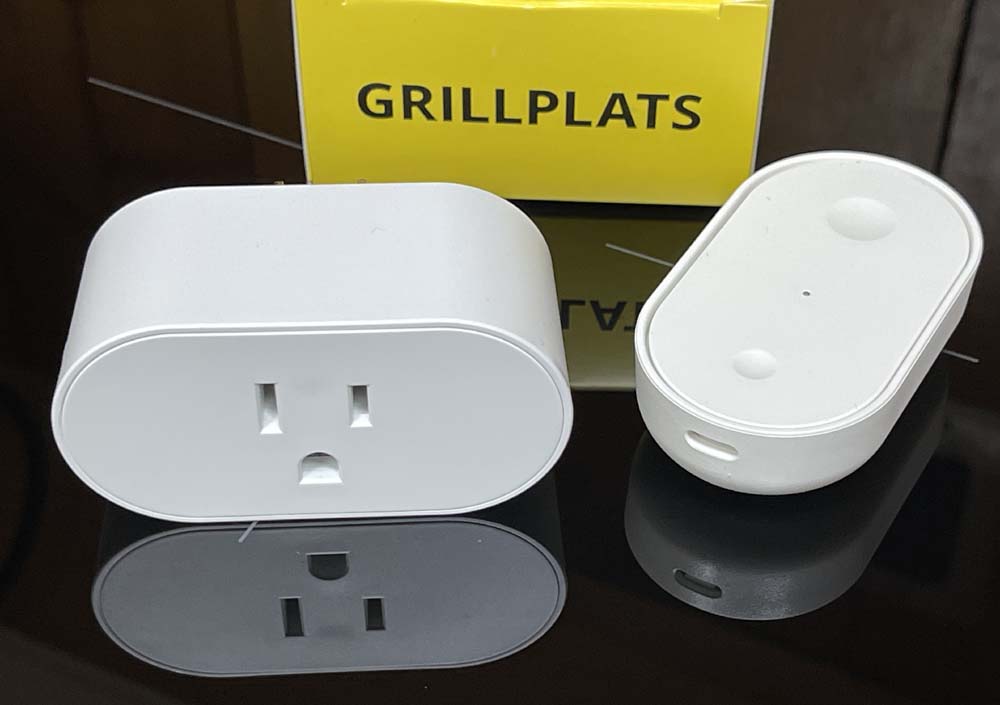
Regardless, the new Grillplats (Grilling Place, or some area where you have an outdoor grill for cooking) has arrived and is for sale at stores. If this is like any other Ikea devices of this nature, they will sell out immediately.
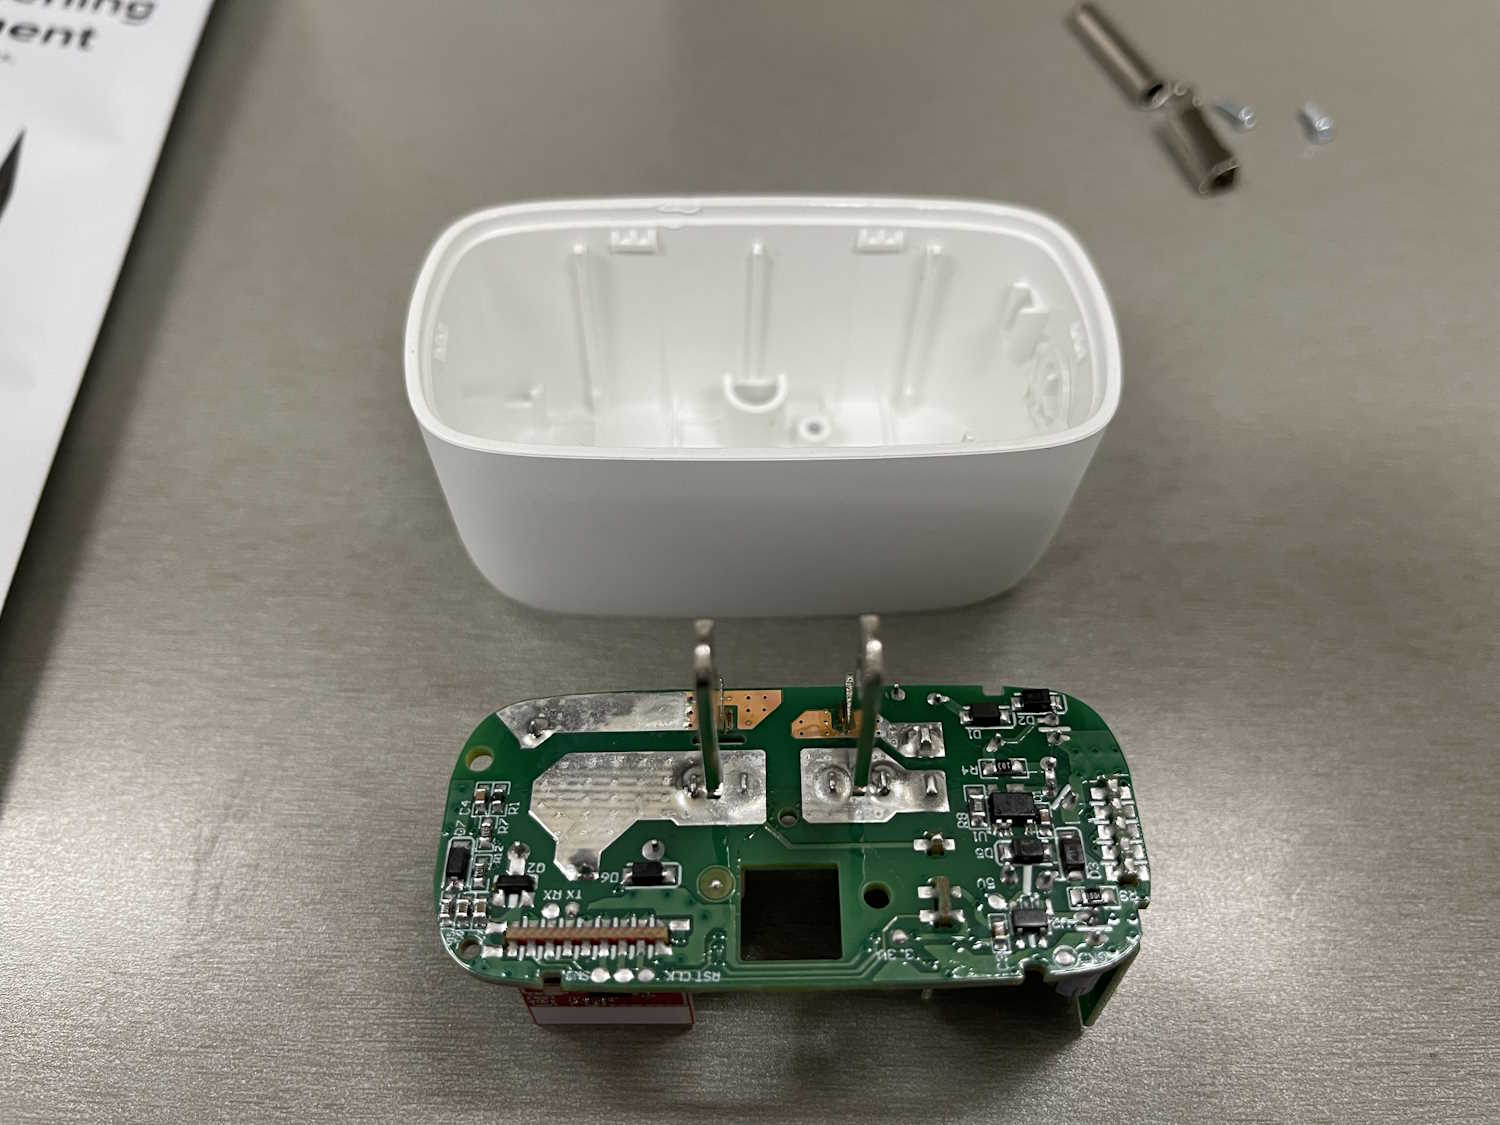
What’s in the Grillplats box
(All of my experiences are coming from using Home Assistant. YMMV here.)
The plug comes in the standard white box with a yellow top listing the name. Inside, you get both a plug and one of the new Matter-enabled Billresa (road trip) buttons. The button features two separate buttons that can be detected as single push, double push, or long push. Sometimes. Home Assistant doesn’t seem to be able to reliably keep one of these active without pinging it at times, or doing a song and dance to make it work again. That’s not the point of this article, however.
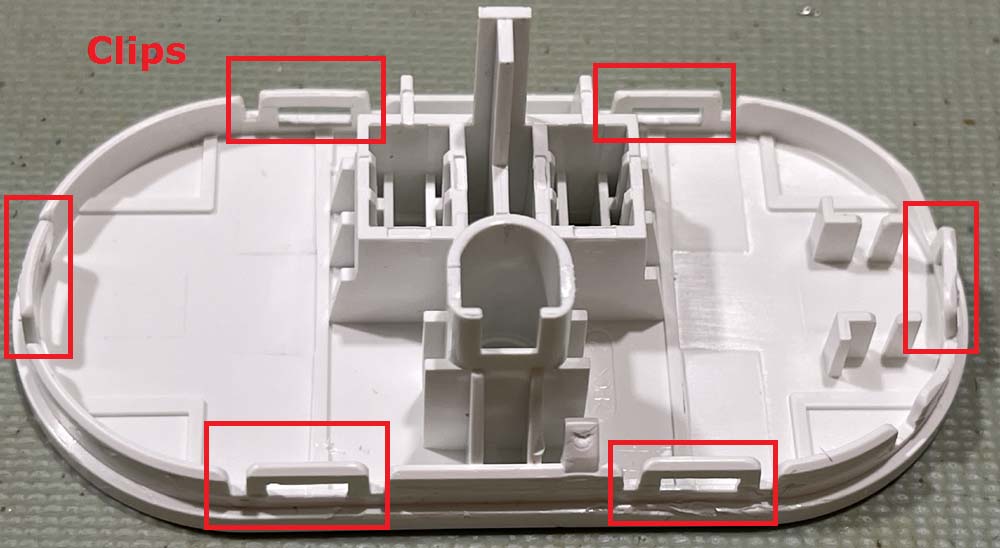
The new device is not as wide as the older Inspelning, and has a white face instead of the gray face. This one tears apart much like it’s older brother - there are six clips around the outside of the device. Two on top, two on bottom, and one on either side. You’ll need something like an iOpener to pry the unit open and pop the clips. Note that because the top panel isn’t as wide, it’s less flexible and doesn’t want to pop as well as the older one. Be gentle here, I mangled a side clip when tearing apart.
The board itself looks like a more compact and kind of janky version of the previous model. It’s very similar, save that components are packed tighter. Two screws hold the board into the case:
To remove the board, remove these two screws then gently press the assembly down on a hard surface. The board should slide up, then you can remove it by gently pulling on something. I usually use the combination of the “L” socket and the relay as a gripping point. The board assembly just lifts out at this point, and the safety ground plug will come out as it’s not attached to anything.
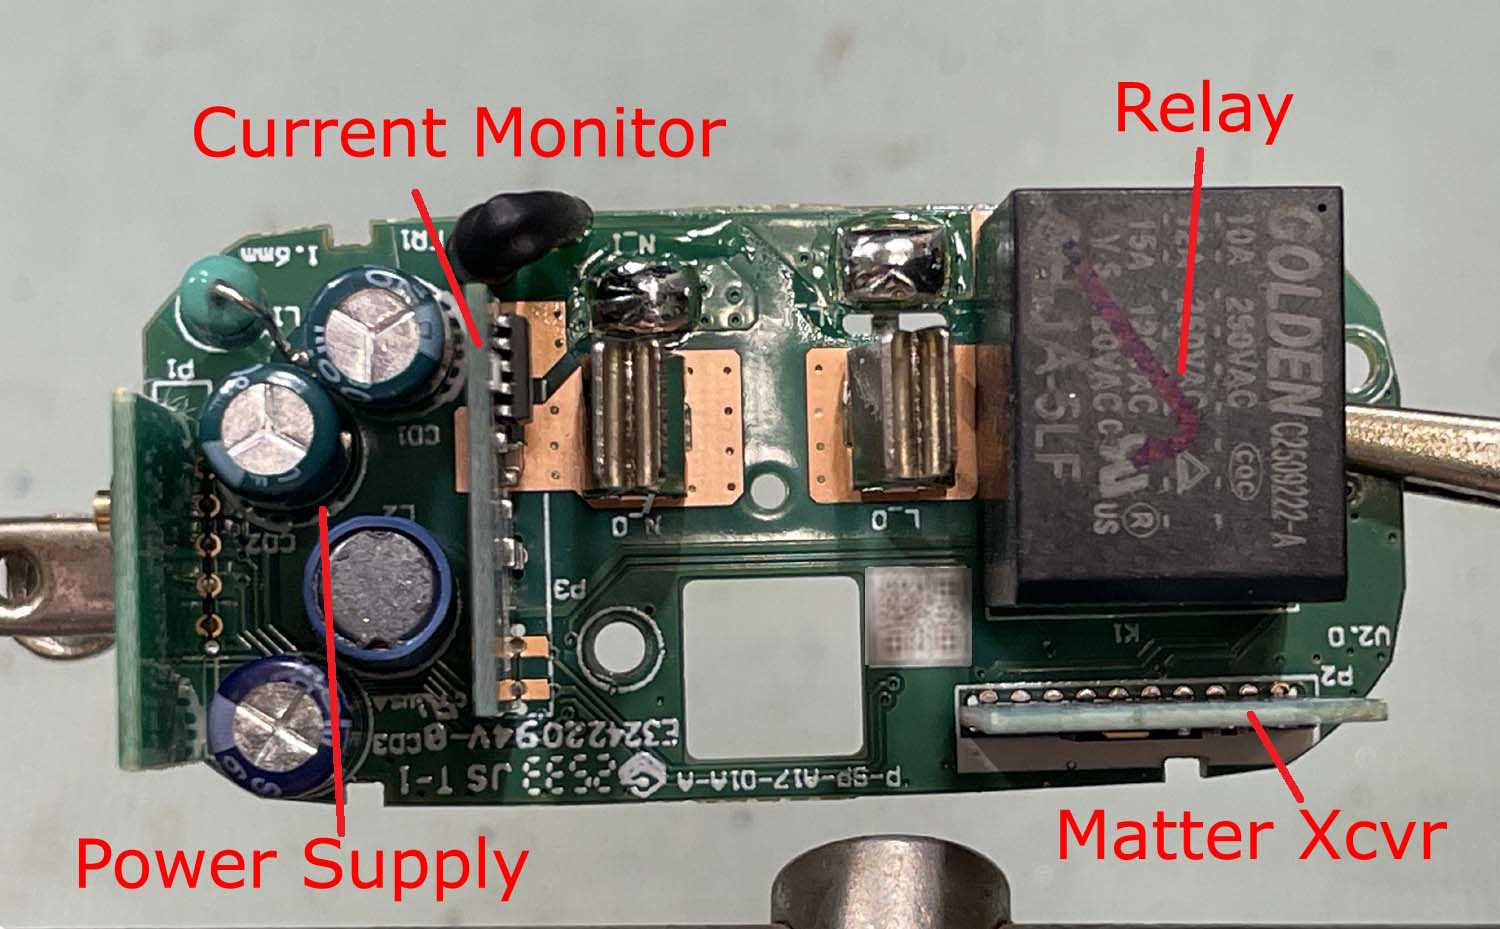
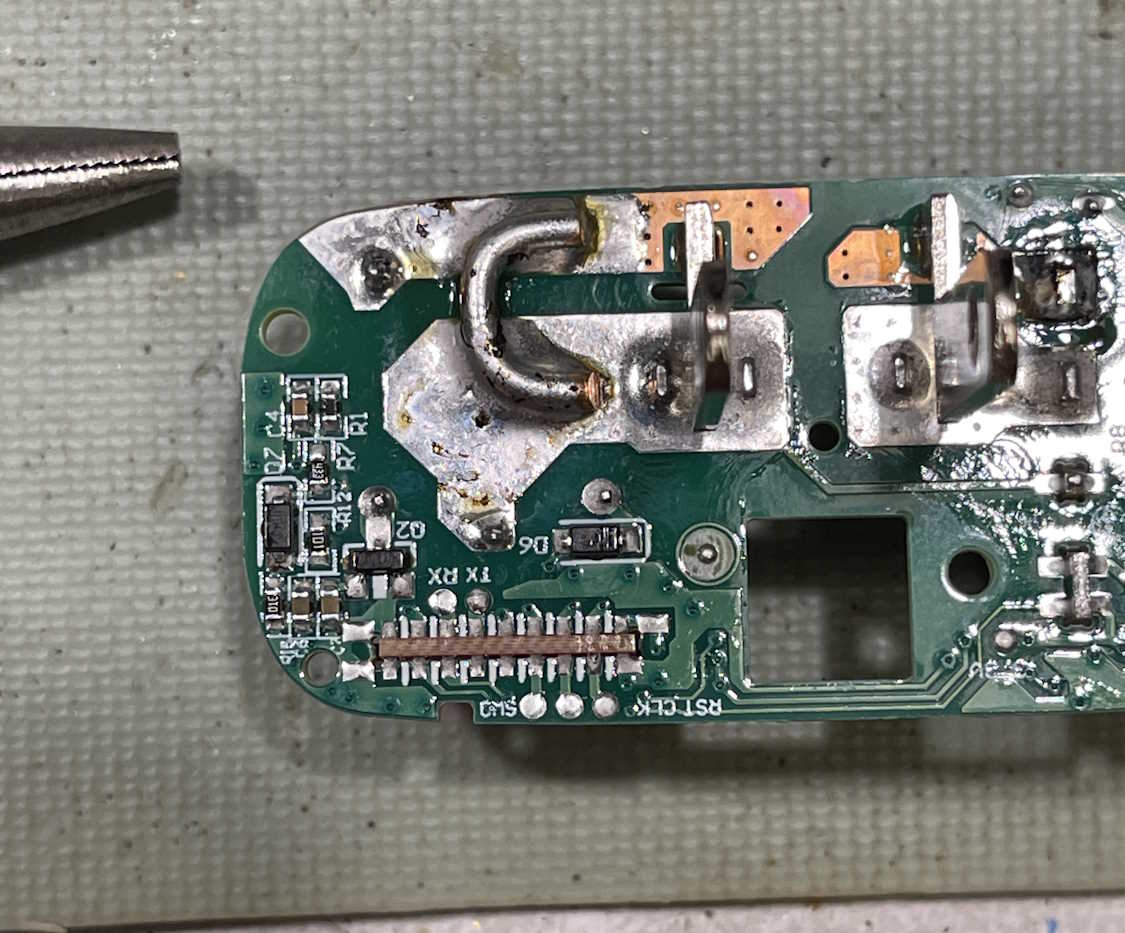
Most things in here seem to be similar to the previous gen. Power supply is a bit more compact, but they’ve put the dropping resistor in the corner away from the capacitors. Any heat generated, assuming your outlets have the ground on the bottom, will rise up away from the capactors. They’ll still dry out and fail, of course, seeing as they’re the cheapest you can get. Other than that, you have the power monitoring board, a new Matter transceiver, and a cheap as chips relay. I didn’t try it, but I suspect you could lift the Matter board and put it in one of the older devices.
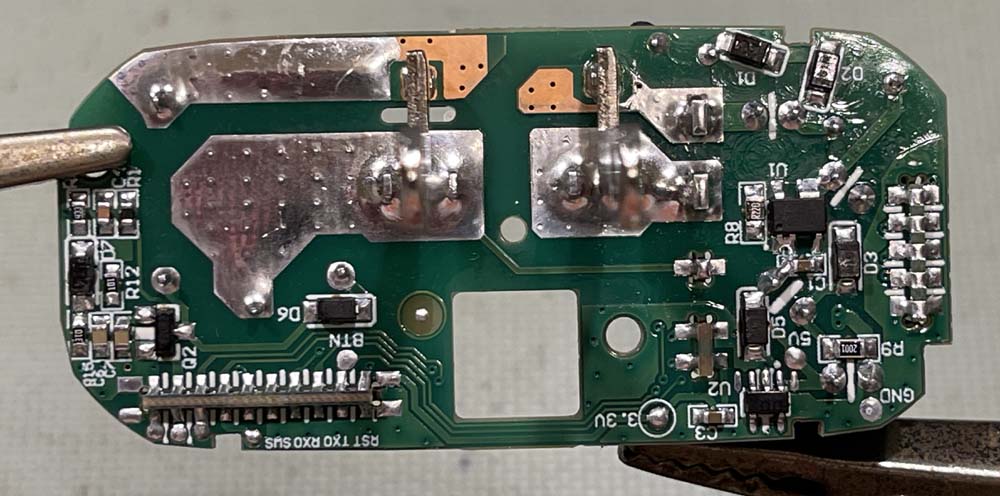
The back is similar to the older unit as well, with two big pads where the AC rides in the unit. This one can be easily modified to make an always on device as well by jumping those two pads with a heavy piece of copper wire.
As before, if you are tearing these down and working with them, you need to remember that there are potentially lethal voltages in here. This can kill you and cause property damage. This information is provided simply so you know what’s inside of the device without tearing it apart, anything else is on you. If you don’t know what you’re doing - don’t do it!
Putting it back together is, of course, the opposite of disassembly. Push the board back in, replace the screws, replace the ground plug, and pop the top back on.
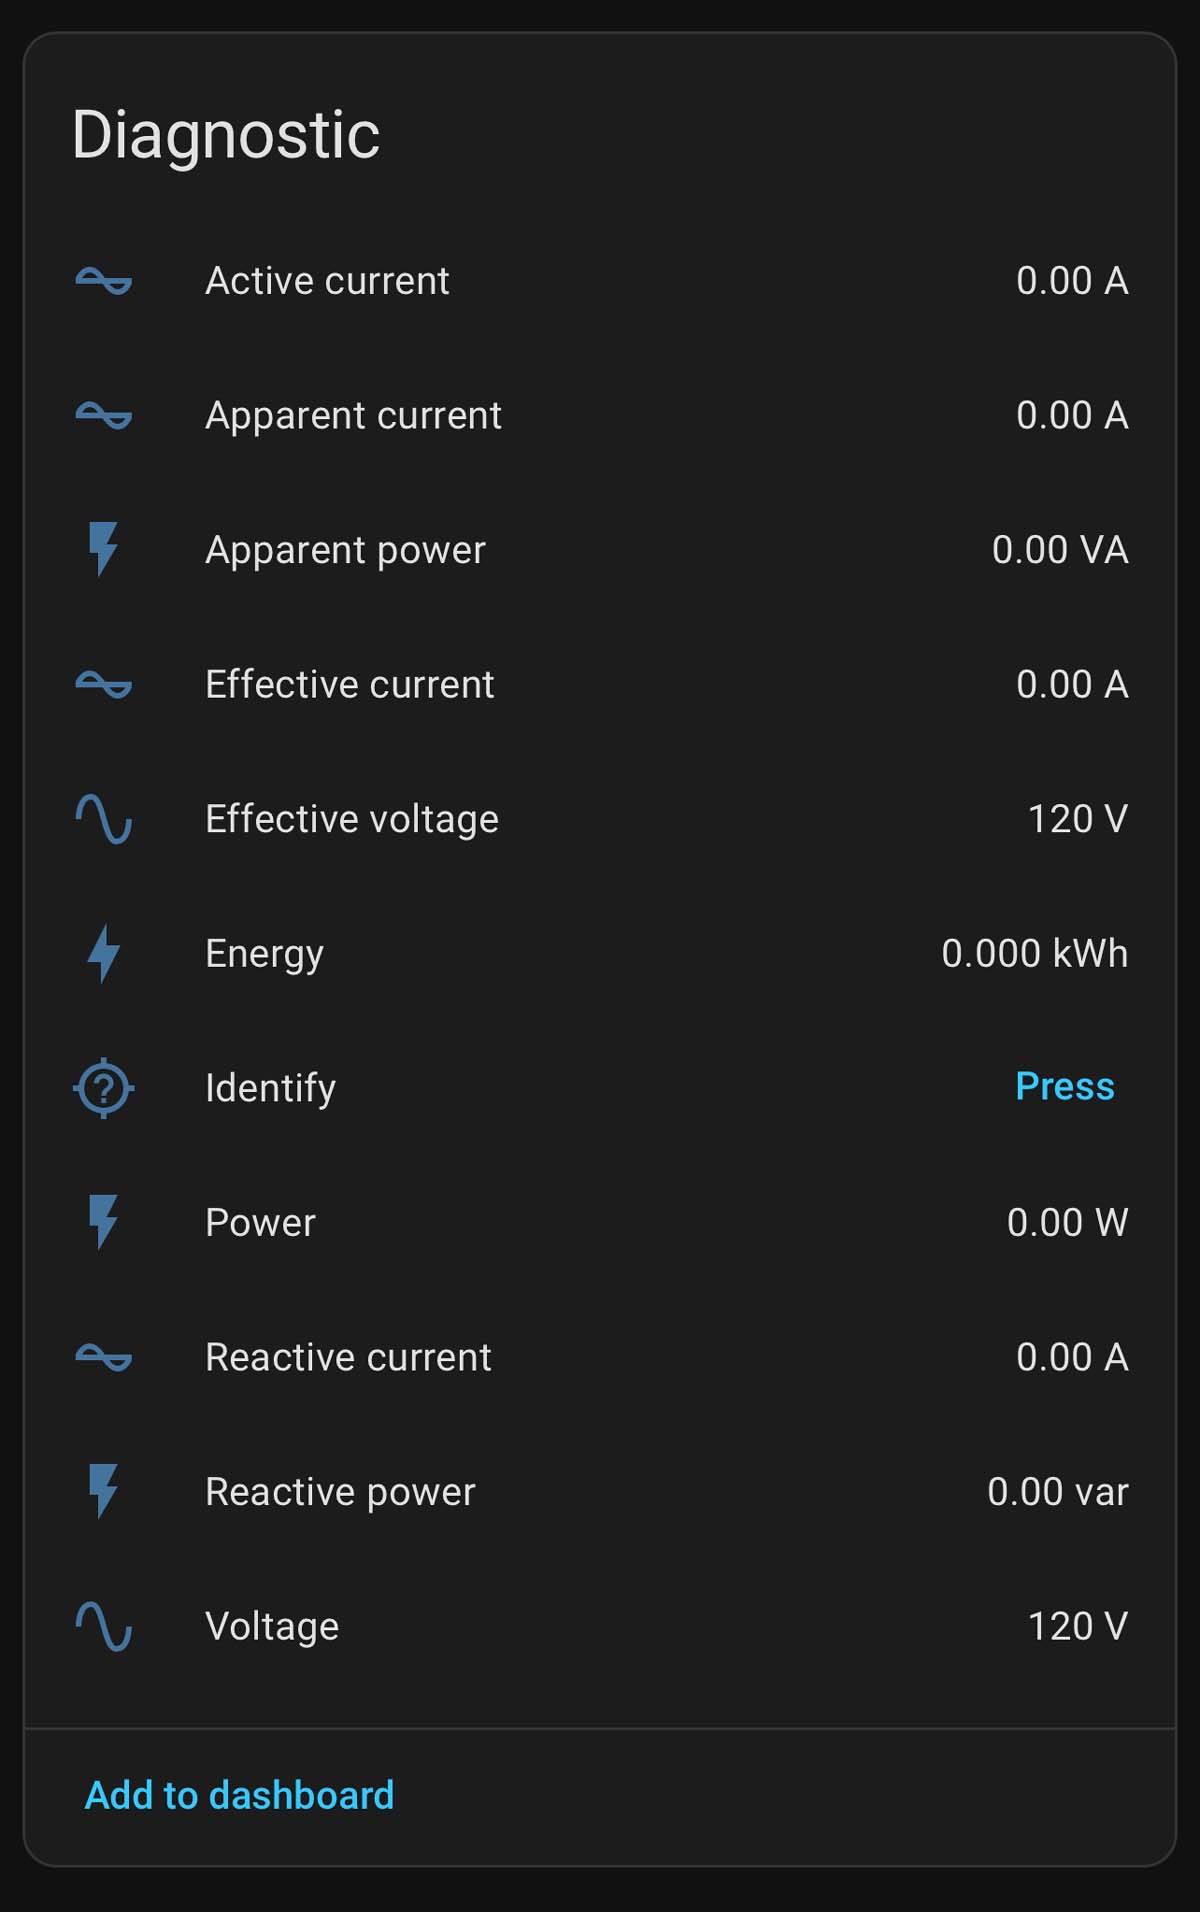
The unit itself reports a lot more than the last one:
Conclusions regarding the Ikea Grillplats plug
This seems to be a worthy counterpart to the previous unit, even if Matter seems to be a bit more janky when dealing with Home Assistant. It can be modified to provide always-on current monitoring. Will it last? Time will tell.
If you’ve been around for any length of time, you’ve probably heard the term X10 thrown around. This is doubly true of anyone who has had an interest in home automation, as X10 is the granddaddy of all consumer controllers. If you haven’t been around since the 70s, you may know X10 from those creepy “Spy on half-naked women next door” camera ads from the early days of the Internet.
X10 was nvented by a Scottish company (Pico) in 1975 and marketed by BSR (the cheap turntable company!) it was eventually picked up by multiple vendors. Leviton made modules for BSR, and later simply became white label devices or X10 Powerhouse branded units. GE offered Home Minder. Radio Shack’s brand was Plug ‘n Power. Stanley Tools sold Lightmaker. IBM used Home Director. RCA offered Home Control devices. Magnavox, Sears - countless others with names from the past offered them. There were other, smaller names that had all kind of doodads and interfaces that spoke X10, and GE even had a set-top programming box that was just downright futuristic. There’s a wealth of devices out there, and it’s still in use - albeit at a much lower rate than it was in the past due to the uptake of cheap wireless devices.
But, the stuff is still there and it’s still just as useful as it was way back when, especially now that noisy CF lamps have basically vanished.
X10: How does it work?
X10 is a home automation system that uses digital pulses that ride on the AC line to address modules. It uses a “house” code, a 16 bit number, followed by some “key” codes. The House and Key are heard by the entire system, but only the module with the appropriate settings will respond, unless it’s a ALL code. The good. bad, and ugly of this system is that you can have any number of modules with the same address because they don’t talk back, but the bad is they don’t talk back so you don’t know if they responded to the command. The ugly is since the signal is on the AC line, it can be interrupted by noise, or lost due to distance from the controller to the listener.
Why use it when zigbee, zwave, and matter wireless devices exist?
There’s a massive base of X10 products out there, and some work without the need for heavy lifting. That is, you can have standalone clocks and controllers that don’t boot and don’t require an OS to continue working. There are modules, remotes, controllers of all types, even landline phone interfaces available should you have such items available.
For example, my X10 system contains the following things:
A BSR Ultrasonic Remote Control base unit (remote not shown)
A Stanley Lightmaker desktop controller
A Stanley Lightmaker Clock Controller
The clock controller is the failsafe for the system. If power fails and the system shuts down when I’m not there, then power resumes, the battery backed up clock will still perform basic functionality - no network connections needed. It handles what I consider to be important lighting to make the house look lived in - main rooms, outside doors, and other things of interest. However, I’d still like to talk to these devices with Home Assistant. I’ve found that there are three ways to do that, but…there are caveats to each method.
So, how to actually talk to X10 with Home Assistant?
The first is the official way. This uses an intermediary called “HEYU” with a module called a CM11A. This is a hardware serial interface between the controller and the power line. It has the capability to both convey X10 signals, as well as store simple programs. HEYU is an old program that translates commands to X10 format for the CM11A.
HEYU is pronounced exactly how it looks: Hey You! - the author states it was so named because he was always yelling “Hey, you! Turn off the light!”
So, why not use this?
Simply put, if you’re running HAOS, you can’t. There’s no mortal-friendly way to build HEYU and put it inside the container that holds Home Assistant. The official documentation that Nabu Casu offers for this is, as per their SOP, quite sparse on the matter and doesn’t offer any insight at all.
While I realize that X10 is quite old and not many people are using it, offering an official integration in this halfway manner is kind of the way Home Assistant works.
All is not lost. There are two ways that you can talk to X10 devices without the official integration.
Method 1: HEYU with BlueLava on a remote machine
So there’s another term. BlueLava…what is that? It’s an old CGI script that provides a user interface for HEYU. The interesting thing about this script is it passes a URL that does the work, so by pasting a URL into your browser, you can cause BlueLava to trigger an X10 command.
I already have a BlueLava/HEYU system, and Home Assistant can CURL a URL, so this is the method I’ll be investigating in the next part of this series.
Method 2: Lots of weird hardware
The second way I can see doing this is to use one of the many remote pendants X10 has, coupled with some sort of zigbee/matter/etc. addressable switch, like the ones offered by Shelly (among others.) This requires a lot of soldering and disassembly and isn’t really a friendly way of doing it. I’ll probably not look at this one unless I get a wild hair and simply want to make it work for … reasons.
What next?
In the next part of this series, I’m going to investigate calling specific URLs to the machine that hosts my current controller. Stay tuned!
I’ve always wanted to have some of the switches in my home addressable by some sort of remote control system. For the longest time, that meant using an X10 device, or some exotic home control units that often times cost a lot and/or required some intensive rewiring that I simply wasn’t willing to undertake.
Enter Shelly devices.
These little modules do pretty much everything I had wanted. They’re small enough to fit into most current electrical boxes (older homes like mine will still require some rework.) They offer power monitoring, as well as local switching capability - that is, you can still use the lightswitch that is currently there. They’re also cheap. Under $20 per, even less if you don’t mind an older generation that doesn’t offer 50 million ways to connect.
These are primarily WiFi devices. The newest generation offers Matter control, but they have a local UI that you can talk to. Shelly provides an application that you can run. Or, you can do as in my case - connect them to Home Assistant, as Shelly devices are a platinum-tier supported system.
To get started, I added the Shelly integration to Home Assistant. I did this some time ago when I was playing with a switch unit, so it was already there for this install. That’s a simple matter of adding it like any other integration within Home Assistant.
First thing I like to do it power them up with a cord I’ve made for this purpose and connect to the WiFi UI on the device. This is a local AP, unprotected, and sits at 192.168.33.1. When powered, you’ll see a new AP with “shelly” in the name. Connect, go to the above address once your device has negotiated everything, and you’re in the UI. I then set the WiFi to connect to my network, rebooted the device, and went back in with the new IP address and disabled the local access point. (Home Assistant will warn you about this if you don’t turn that off.) The Shelly integration then found the devices and automagically added it.
Past that, it was a simple matter of creating dashboard panels and automations like any other device.
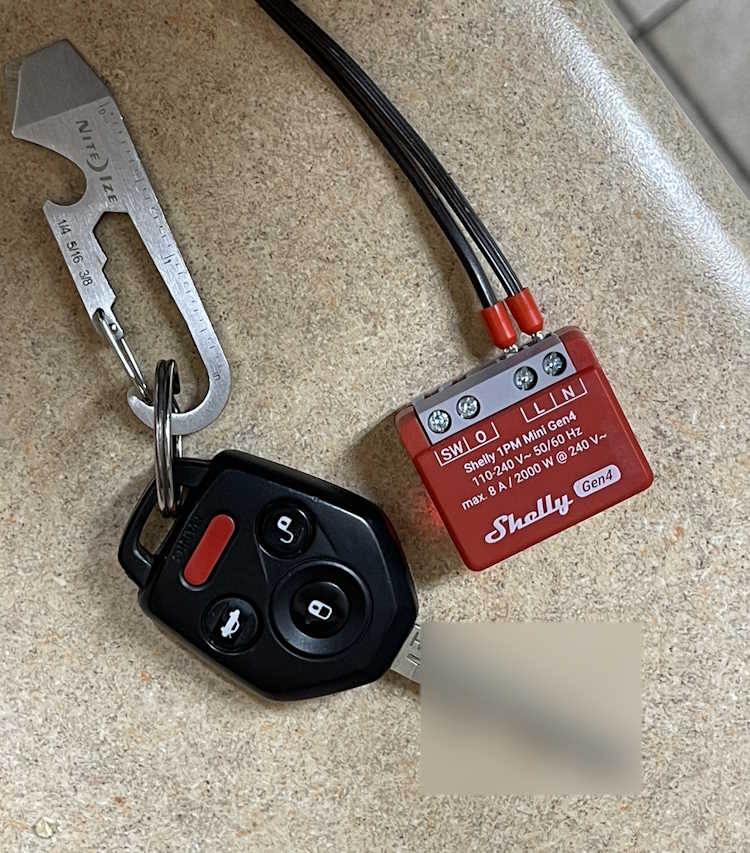
I used two different devices this round:
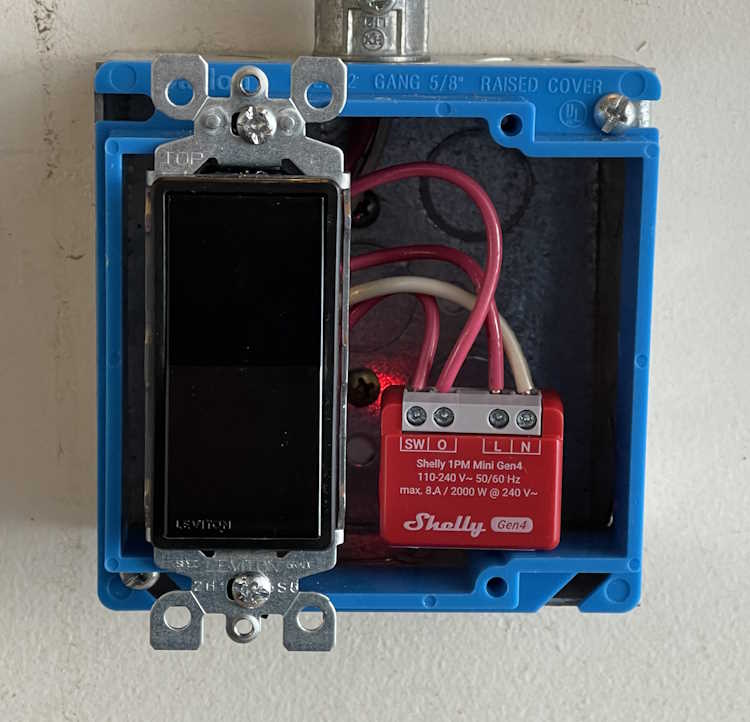
This is called the Shelly 1PM Mini Gen4. (Yeah, they need to work on those names.) It offers both remote switching capability via WIFi, and local switching capability via the “SW” terminal - you simply input the switched line voltage from the original toggle and it takes care of the rest. Other than a slight delay in switching, you notice nothing.
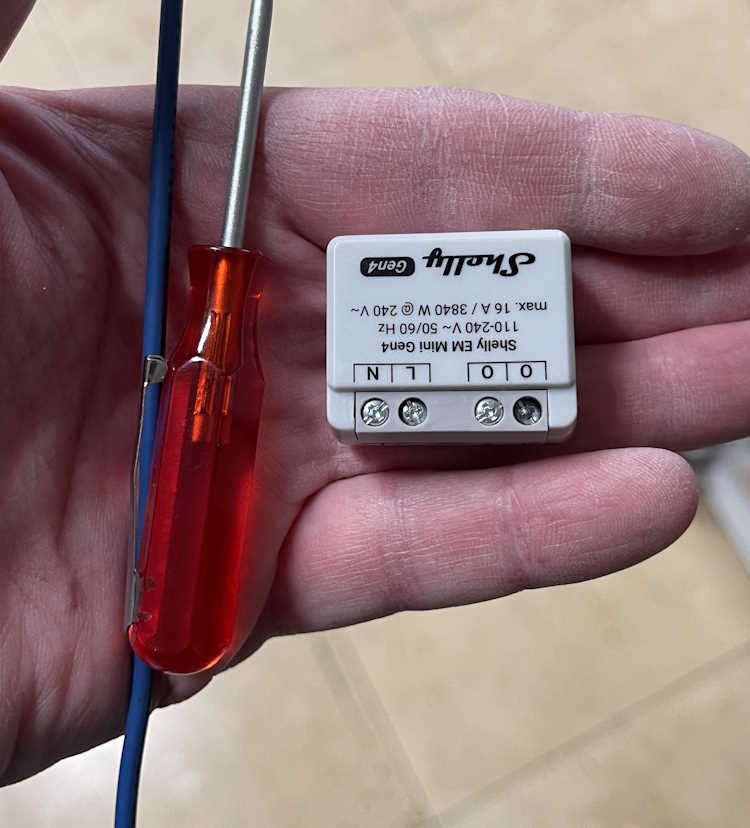
This device is similar, but offers a higher current capacity without any switching capability. I’m installing one of these in an outlet connected to my clothes washer. It connects the same way, just give it power and set up WiFi. The two “O” terminals are the line outputs, you use a single neutral connection which doesn’t pass through so you’ll need to jumper from the neutral line to this device. This is similar for their entire offering.
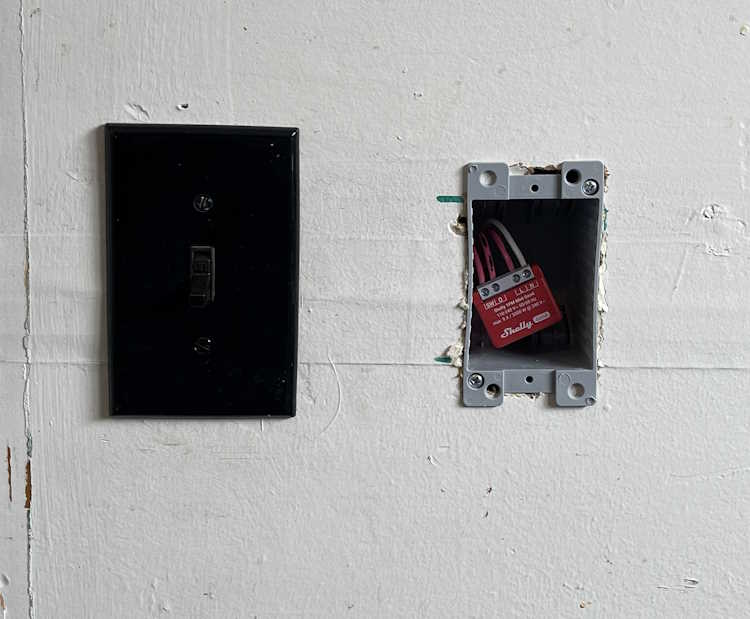
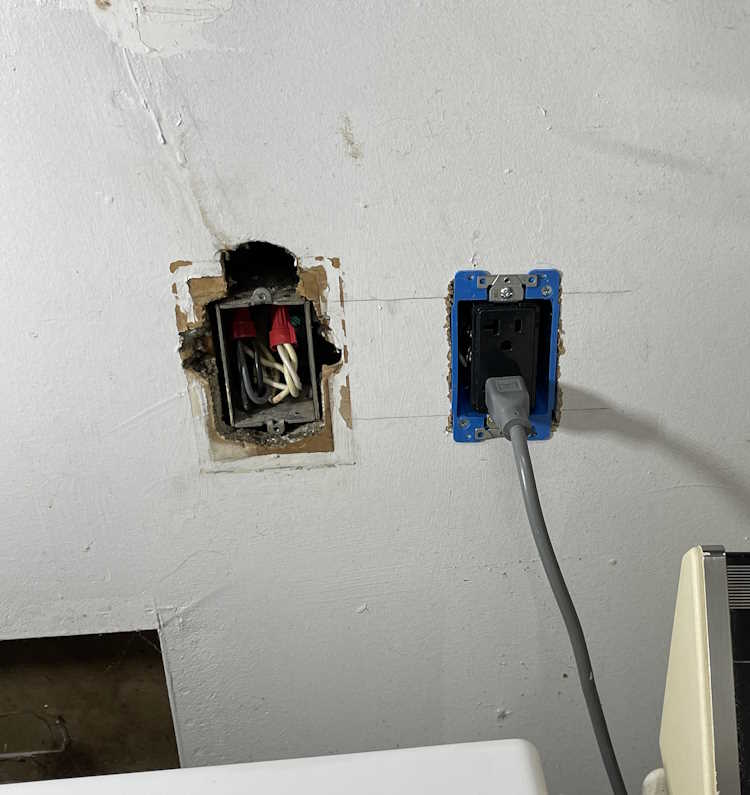
First one is the “Back Porch” lamp. That’s just a wall sconce with a bulb, like any other outdoor lamp you’d have near a door. Boxes in my home are old, small, metal, and cramped. Mounting nails go through the box into the stud, which reduces available space even more.
I decided to mount a new box next to it, just for the Shelly device. Cable was jumped and clamed to the device, and it got covered with a blank plate. Easy in, and can be changed without issue.
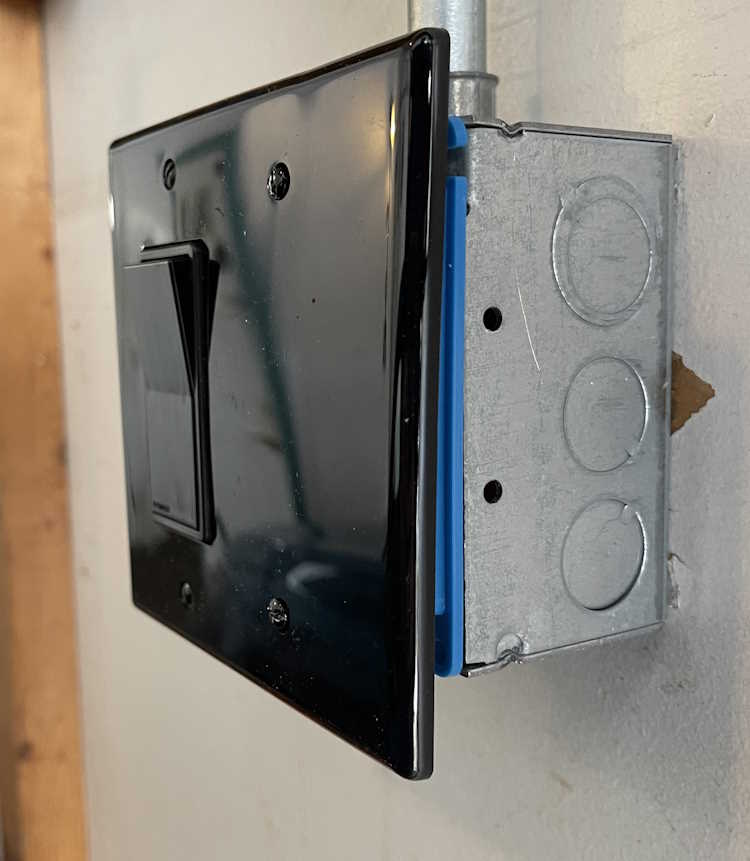
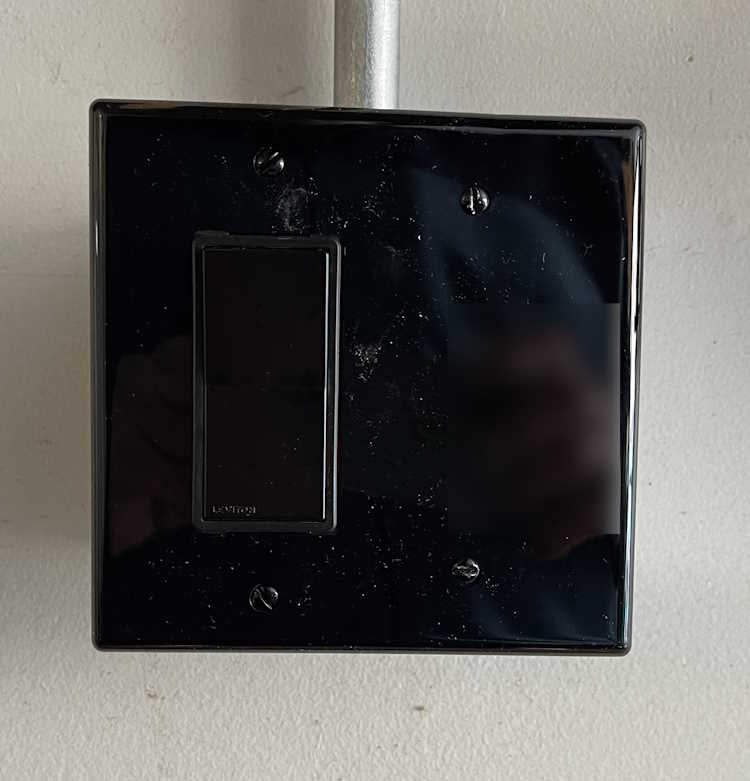
The second PM1 went into a lamp in the garage itself. This is just a wall lamp I put in for some extra light. It’s scheduled to come on and go off at certain times when I have a high probability of being in the garage. This is an on-wall piece of conduit, with a metal box. It originally had a metal plate, so I removed that and replaced with a plastic mud ring and cover. A Decora switch was used because that’s the kind of plate I could get at the time. Like the other unit, this one simply sits to the side of the switch, It faces my local AP, so there’s no signal issue with the metal behind it. You’d never know there was something inside…
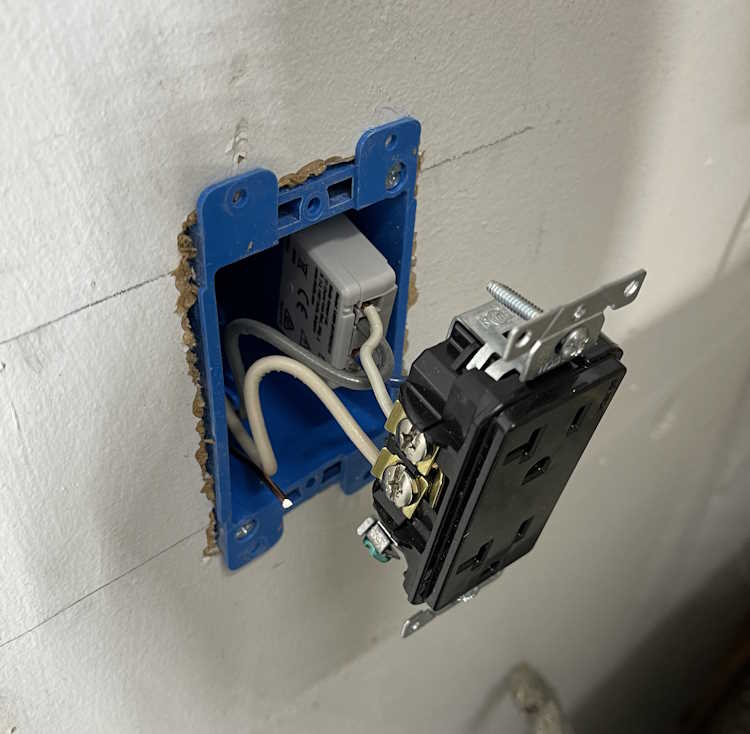
The third one for this install was the monitor-only device for the clothes washer. Again, this was a small metal box, and had a lot of wire in it. I took the opportunity to mount a new box next to it, run some fresh cable, and make the connected in the new box. The EM was attached to the back of the duplex, and simply slides into the box. I left enough cable that this can just pull out if need be, and the device is right there.
The screw terminals on these are just big enough to take a solid 12 AWG wire. Anything larger won’t fit.
This one looks messy because the previous owner just broke into this box and ran a wire upstairs for an AC unit. You can still see where that was on the wall, and is evidenced by the big hole above the box. This line feeds the washer, and some of the kitchen - fortunately they did pick a 20A circuit, but it wasn’t rated for continuous use + kitchen gadgets. I took the time to tidy up the connection so it wasn’t overly cramped in the box.
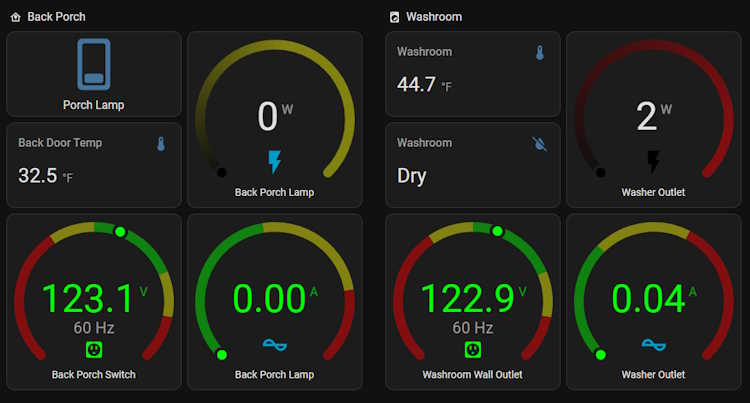
So…what does that look like in Home Assistant? That depends on how you set it up, but this is what I have:
The lights all have switches. The monitor-only just has outputs because there’s nothing to switch. So far, it’s worked quite well and all automations I’ve set up have fired flawlessly.
So what’s the takeaway here? I’d consider these devices to be in the “experienced” category if you have the electrical system in your home that’s able to handle the extra size capacity, or “advanced” if you need to do what I did. They aren’t a beginner thing, but their operation is exactly what you want - quiet, unobtrusive, and full of all kinds of good information.
I’m going to be installing a few more of these devices before I’m finished.
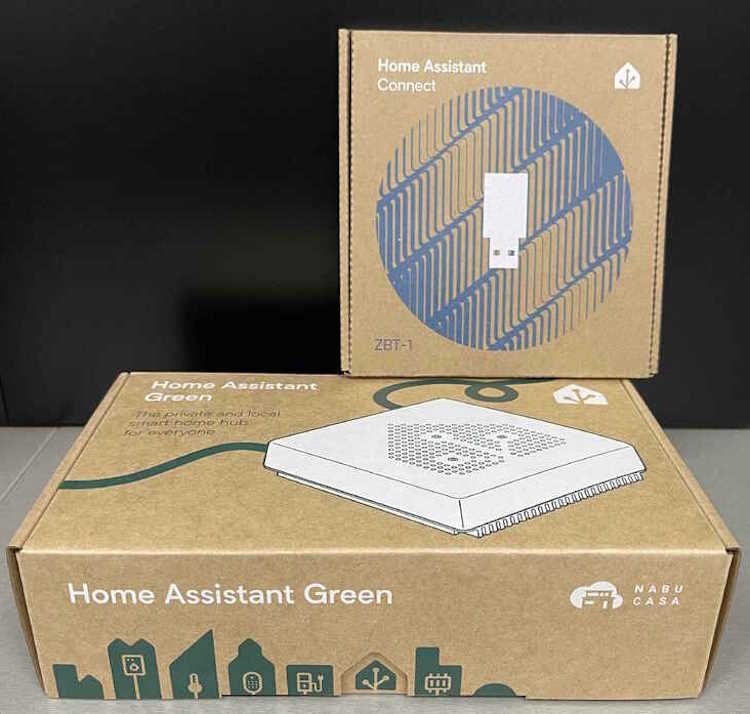
Recently, I updated my Home Assistant system with a couple of new items that enable thread and matter support. The first is the official “Home Assistant Connect ZBT-2,” a device that much like it’s predecessor, allows either ZigBee or Thread/Matter connections - but not both. The second is one of Ikea’s new Matter devices, a “Timmerflotte” (wood raft) temperature/humidity sensor with a name that was obviously pulled from the same void that most of Ikea’s names are pulled from.
Here’s the ZBT-2:
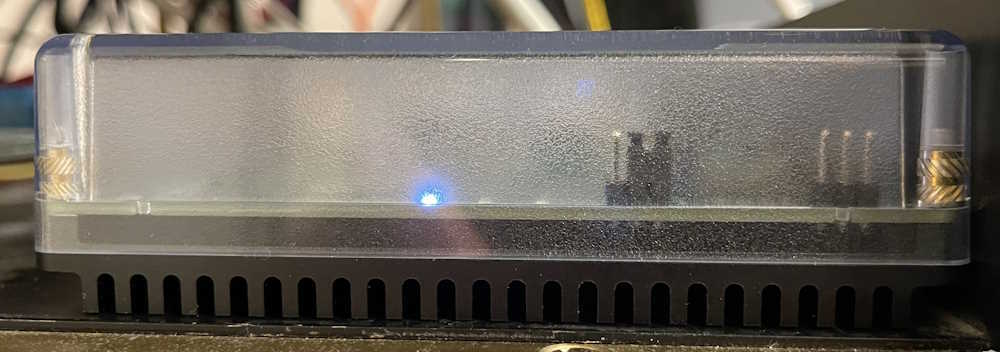
This is basically the z-wave device’s little brother. It supports a ZigBee connection, OR can act like an Open Thread Border Router for Thread devices. It’s a beefy device, heavy enough that it stays put, and comes with a decently long USB A to C cable for connection to your HA device. As it has a real antenna, the range of this device should be much better than the little PCB antenna on it’s predecessor, but YMMV here as I can’t test that due to all of my devices being in a relatively small area that the ZBT-1 has no problem reaching from the other end of the house.
You’ll notice this device has a translucent top. That’s because there are 4 RGB LEDs in the base that transmit light to the top via a lightpipe. You can’t use these LEDs from within Home Assistant, however, so I’m not sure why they are there. The unit lit up blue during the initial setup, and now it’s dark. Unless they’re going to add these as a controllable entity later in the process, I don’t know why they are there - it’s just added expense and devices that will never get used.
This device should just be plug and play, however, when I plugged it in my Home Assistant Green didn’t see it. A reboot didn’t cause the device to see it. I unplugged and plugged a few times before the Green finally decided it was connected. After connection, you have to choose what you want it to be, and I chose Thread. Home Assistant then begins to upload the firmware and configure the device, after several minutes it releases it and you’re ready to start adding things.
I did notice that, according to Home Assistant, this is a “bronze” level support device. Why is a device made by the official provider of Home Assistant - it’s own product - at a lesser support level than the top tier? I have no idea, but that seems to indicate to me that they rushed this out a bit earlier than needed. There shouldn’t be anything lower than platinum (top) tier support for your own product.
But, after messing with it for some time, it did work, and appears to Home Assistant as what it should be.
The device I wanted to add was one of Ikea’s new Matter sensors. This one, the Timmerflotte, is a standalone temperature/humidity sensor. It uses AAA batteries, which is a nice feature. It’s rather large, however, but does offer a hook hole on the back for you to hang it on the wall or wherever. The batteries are under the back which pops off with a little screwdriver slot. You can also access the reset button here, as well as the C°/F° switch. They come set to celcius, so I switched the device while I installed batteries. It immediately goes into pairing mode when you put batteries in, but will time out after a while. I set it aside and let it time out.
You’ll notice it’s big. Bigger than other temperature pucks. At least you would have if I’d given some scale…sorry about that! It also has a display on the front, a white LED display made up of point-source LEDs that activates when you push the top down. It shows temperature, then humidity, then turns off. That’s cool and all, but only if you have it out where you can access it. If you’re using these for measurements in, say, a cabinet or some other hard to access place, it’s kind of useless. But it’s there, and I guess someone thought it was a good idea.
So, how to connect it to Home Assistant?
The ZBT-2 process installed the needed Thread components, andI I installed the Matter component in HA’s devices and services. No issues there.
The weird stuff started after that. There’s no easy way to add a matter device to your system when it’s running over thread. With ZigBee, you put your host in search mode, and push the pair button on the device. Device and host have a conversation about capabilities, and you’re done. Nothing else needed. Matter - at least over Thread, I haven’t had a network device to try yet - requires a middleman. In this case, you have to take a picture of a QR code with your phone, or link via BlueTooth first before the host can find the device. Another layer of complexity between you and getting this device on your host. So, I used the camera (which was very flaky about finding the QR code, it kept wanting to identify the batteries) to capture the code. It started to pair. I had also held the reset button on the timmerflotte until it started flashing an LED, I’m not sure if you need to do that. The whole thing is somewhat arbitrary, but it didn’t seem to hurt.
And just sat there, and failed.
Why?
No indication of errors in Home Assistant, which is certainly a problem endemic to Home Assistant and it’s services. It’s very unhelpful when something fails, this particular service didn’t tell me anything about the failure except that it did. But, I finally figured it out - Matter requires IPv6 to work. Why does it need this for a local radio protocol? I have no clue, but it does. That’s how Matter is written. No IPv4 for you! Of course, I’ve had IPv6 turned off on the router since it was new, as it’s not necessary for a home network to have it and it’s caused me problems in the past. Turned it back on (thankfully I hadn’t deleted the IPv6 package) and enabled it in Home Assistant, and there it goes. It connects, adds, offers a firmware update, and everyone is happy. I’m able to put it in graphs and automations.
So why the IPv6 for a local radio protocol? It doesn’t need it - but Matter is capable of being used on multiple carrier protocols - Thread, WiFi, BlueTooth (I assume, anyway,) so while you don’t need it for the Thread connection, you can have many many devices on WiFi without running out of addresses. I guess if you’re planning on having 250+ units on one network node, that’s great. Otherwise, it’s just another network protocol you must have on simply because some dev thought it was cool.
So what would I do differently here? The Matter service in Home Assistant just assumes things, much like Home Assistant assumes that the time your router is giving it is correct. Assumptions lead to broken things, and this was no different - the Matter service should immediately check to see if IPv6 is there, and if not then stop and say so. Or at least check when it’s installed. That’s the biggest problem I’ve found with HA, that of assumptions. You can’t and shouldn’t do that. But they do, and it breaks.
But it’s fixed for me, and hopefully this will prevent some grief for you. Just remember, X10 forever!
A few days later…
The Timmerflotte worked fine for about 3 days, then started dropping off and then refused to connect. There are many many reports about these devices being unreliable, and the entire matter-over-thread ecosystem being a mess. There’s even a big github bug report about it where a dev angrily talks about how you need good RF penetration to make it work. See https://github.com/h … uecomment-2604219962 for that thread, and basically just search on timmerflotte disconnect from home assistant for a lot of noise on the subject. On that, I would think the ZBT-2 stick is a good RF network provider, but I guess not?
The short story is that matter can be unstable, especially if you have older devices. Some have good luck, others do not.
I did try to move the sensor closer to the antenna and re-power it, but it just doesn’t want to connect again, even though the device still functions as a press-to-see sensor. I do have some more on order, I may end up just taking them back until the ecosystem matures.
Stay tuned!
April 10, 2026: I moved the device closer to the antenna. You’d think with an antenna bigger than an elephant’s trunk, there wouldn’t be any issues - but moving the puck closer and higher up seems to have solved the connection issue. I have another puck sitting up high on a cabinet, and it’s been reliable as well. So…don’t put these low or out of line-of-sight, because they won’t work. Another matter failing? Who knows.
Disclaimer: This involves working with high voltages and high currents, and is a device that you’re going to plug in to a wall outlet and leave there. Make sure you’re comfortable working with this kind of stuff before proceeding! This is a guide and you need to know what you’re doing beforehand. If you don’t - don’t! Mistakes will destroy property and kill you.
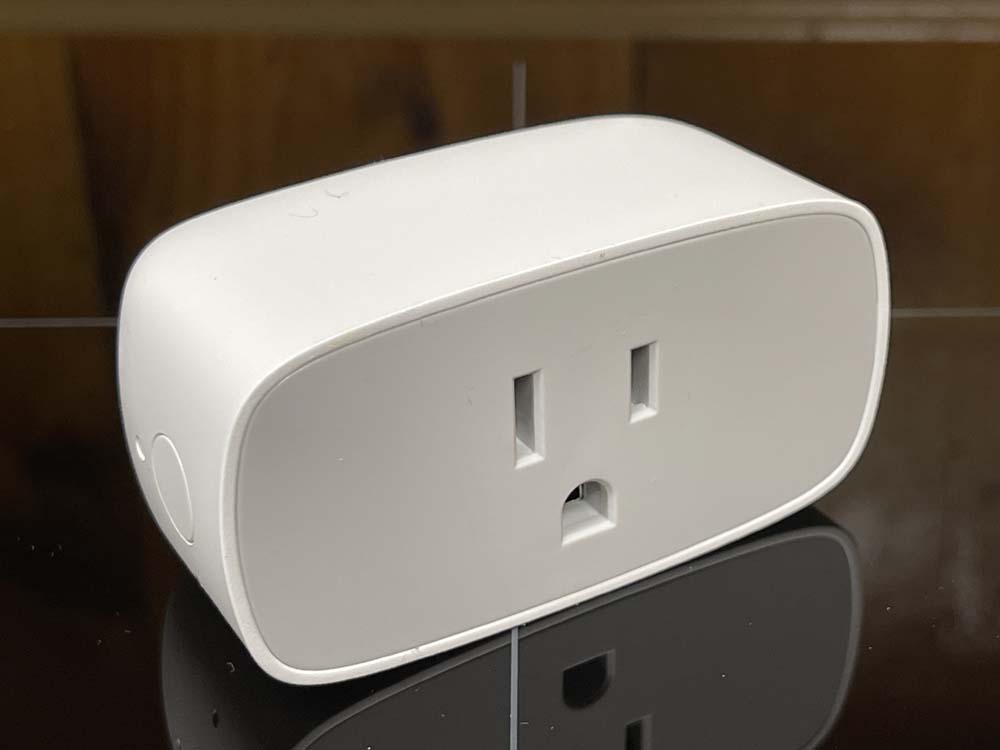
Ikea is one of the oddest stores I’ve run across. Known for their flat-pack furniture, they also have a line of relatively friendly and cheap technology devices that operate on common standards. One of these devices is a smart plug called the Inspelning (translation: recording.) It’s available in multiple countries with different outlet formats, but the one I’m going to be concentrating on is the North America version.
This is a generic ZigBee compatible device that offers both remote control via their own hub and other compatible devices, as well as providing both power consumption and line voltage monitoring functions. It exposes these via Ikea’s own application, or by entities within Home Assistant or some other smarthome system. I’m using Home Assistant, and these have no issue integrating and exposing all information.
So what’s the modification?
These are cheap devices at ~$13 - and you’re not going to find something with a power monitor that’s much cheaper. But…they can also turn on and off, which means if you’ve connected something that relies on being powered on all the time, having an accidental trip that shuts it off could be problematic. My modification is to make the device permanently on. This also has the effect of preventing premature power supply failure, which can cause relay issues and seems to be a common failure mode with smartplugs in general as the components inside are as cheap as you can get. I want a power monitor, not a remote plug, and this is a way to do it.
First thing is to get the device open. These are relatively benign, and are just clipped together. There are 6 plastic clips - two on the top and bottom, and one on each side. I don’t have any pictures of opening because it’s not a picture friendly process, but here’s how I did it:
You’ll need some sort of opener tool. I used iFixit’s blue spudger tool to pry a bit of the top of the case back at one of the clips and then pry up the gray plastic face. I then used one of their “guitar picks” to hold it open while I used a butter knife to pry-pop the rest of the face off. If you’re careful, the gray plastic should deform enough to release the clips on the sides.
I tried using the spudger to go all the way around, but the sides are simply too curved to get a good entry point, and not flexible enough to pry. I wouldn’t try this with a device that’s been around for a while, but a new device should have enough flex left in the plastic that you’re not going to break anything. Try not to insert anything in the lower part near the ground hole, as there’s a piece of circuit card that sticks up in this area.
Once the face is off, it’s relatively simple to access the circuitry.
First, remove the ground lug assembly. This just falls out, as it’s set in a hole. Set it aside. This isn’t connected to any of the circuitry inside, so if you needed a two-prong device to replace something like an old X10 two-pin appliance module, this is the way you could do it. I don’t suggest you do this, however, as modern outlets are all grounded.
I’ve named the various parts, but we’re not really interested in anything but the screws. These are extremely shallow philips screws, so you’ll need something to fit them. I didn’t have the right kind of driver handy, so I just used a thin blade flat to catch and back them out. Don’t apply a lot of force to these, they’re really cheap and wanted to destroy themselves.
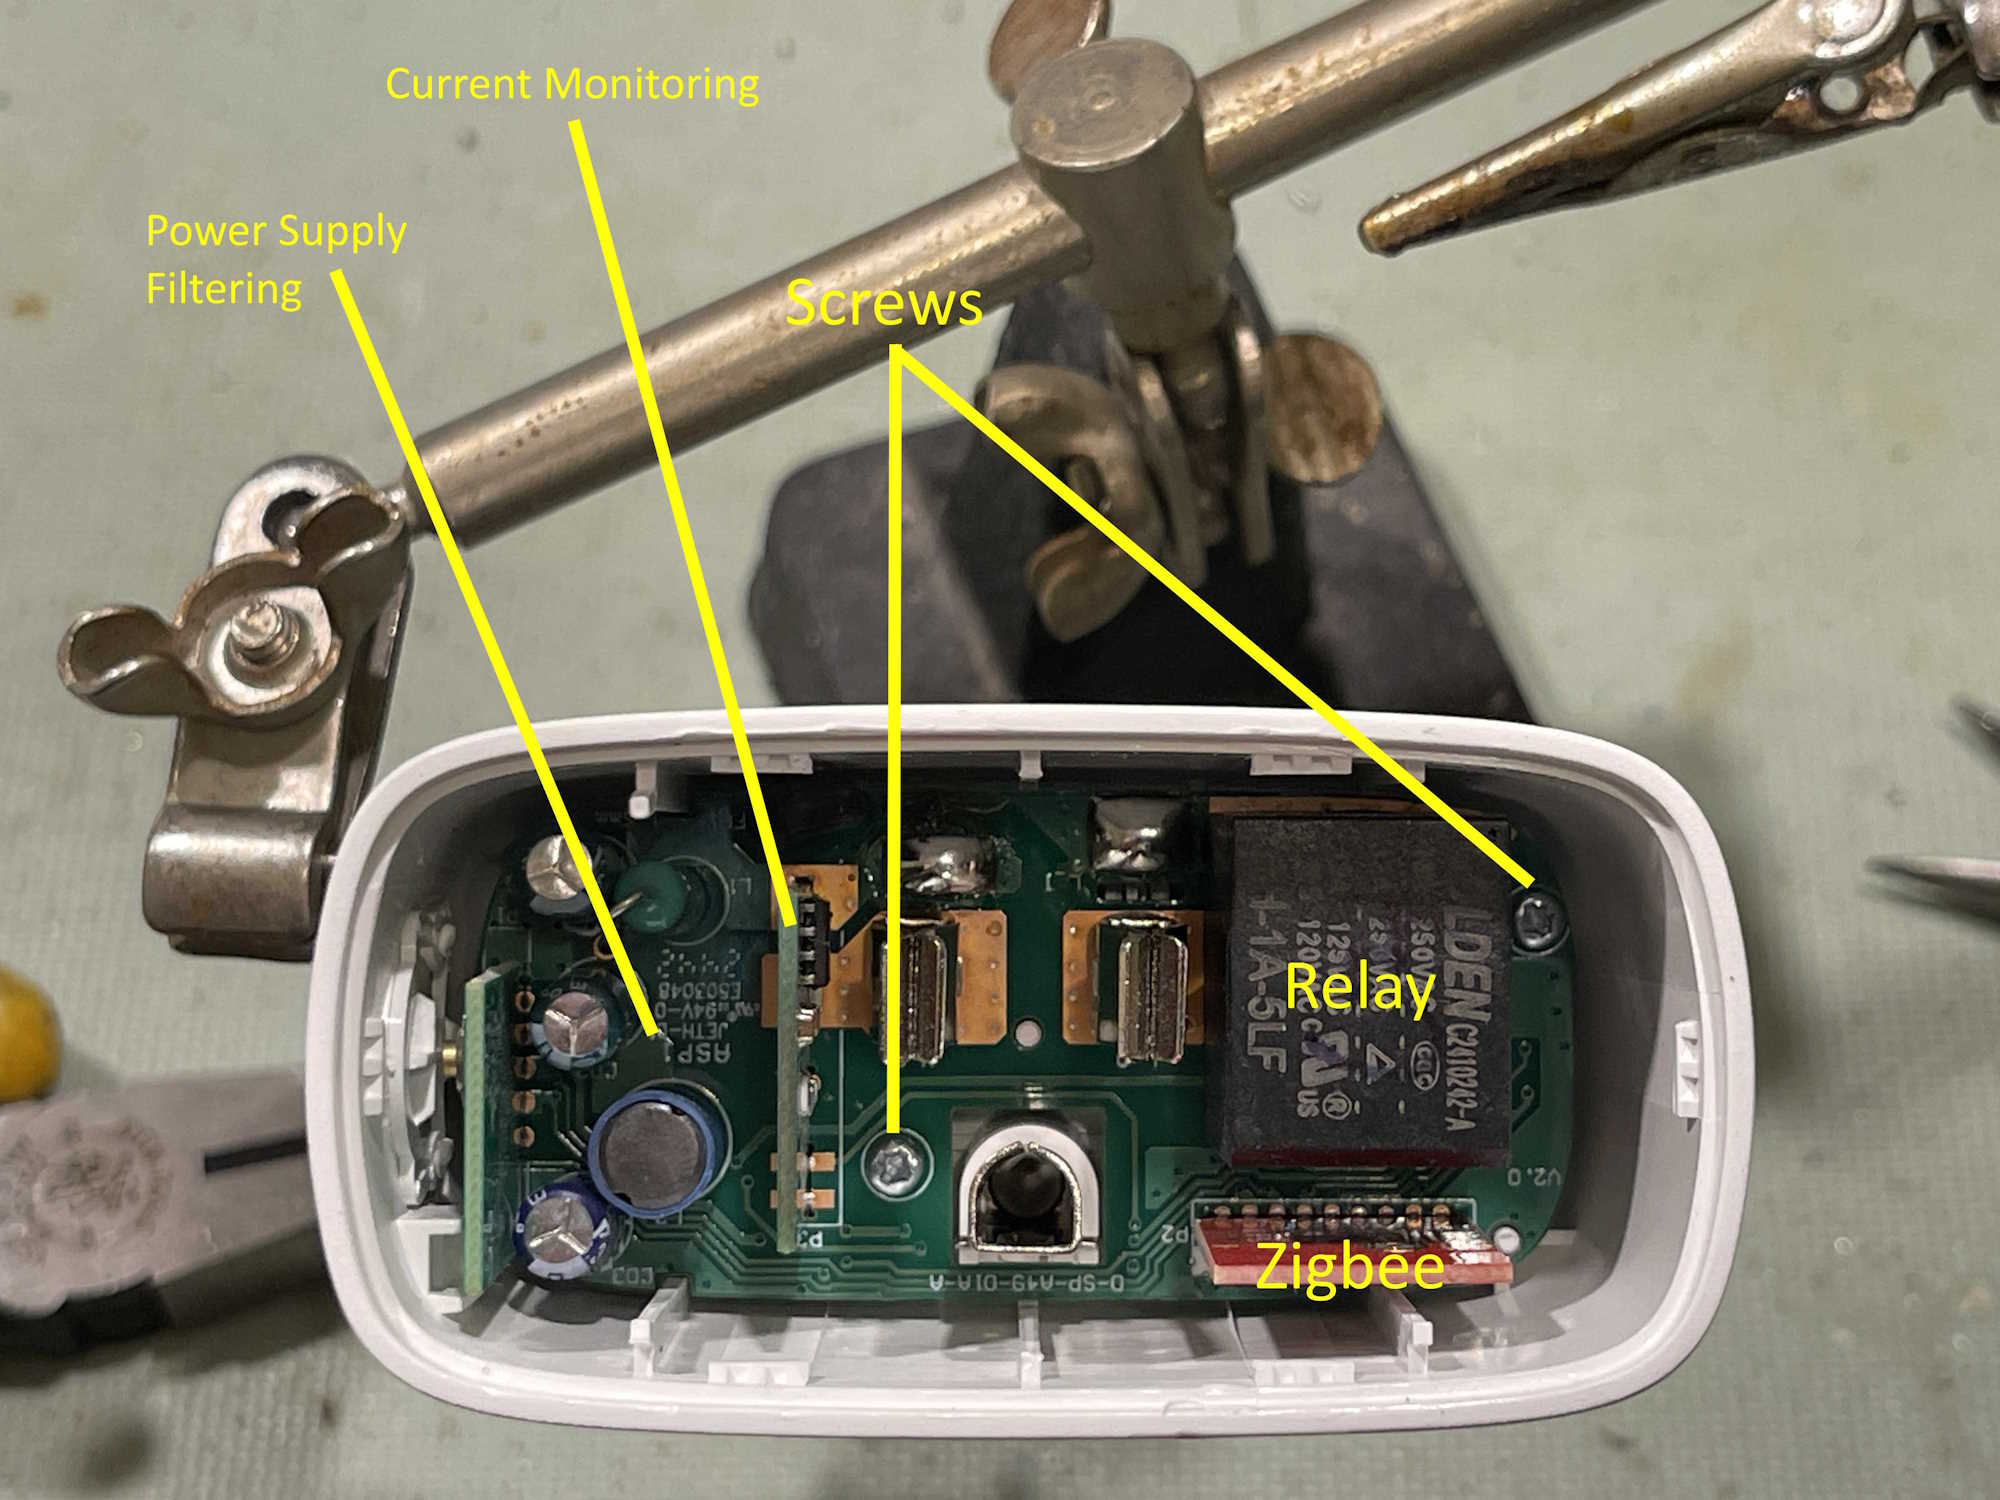
The other parts here are the relay itself, the zigbee control board, the current monitor board, and the power supply filter capacitors. Chances are the latter would need replaced if you encounter a situation where the relay chatters or becomes unreliable, but that’s not a given and outside the scope of what is being presented here.
Push up on the plug tines to move the board to the top of the case. There are little pips that help keep in inside, you may need to gently wiggle to get it out. Avoid pulling on the control boards.
The back of the board reveals what we’re after.
There are two large soldered pads on the left of the board. This is the area that the relay connects when it closes, and connects the hot tine to the hot receptacle on the front of the board. The current monitor is in the neutral line, and is always active so it doesn’t matter if the plug is “on” or “off.”
We’re going to jumper across the hot line pads to create an always on loop. You can still activate the relay at this point, but it will do nothing.
CAUTION - you’re working with something that’s going to be plugged into the wall and will be conducting a potentially large amount of current. Make sure your connections at this point are well-soldered and using a properly rated gauge of wire. A half-ass connection won’t do it here.
I’m going to use a piece of 12ga solid from a strand of THHN. I’ve cut a section and bent it around a pair of needlenose pliers, then trimmed it.
Why a U-shaped piece? Mostly to give plenty of area to solder. You don’t want this thing coming undone inside the case, and the solder is going to be part of the 120VAC conduction area. Err on the side of caution here, give yourself plenty of area that’s soldered to and touching the pads.
Make sure you have a good fillet all the way around the jumper.
Note - you’re going to need a decently hefty iron to do this - your little 20W SMT iron won’t cut it. A good 35W with a flat tip should work, but I used my 80W iron. Make sure your wire is pre-tinned and put a little solder down first. It will probably take a bit of doing to get a good placement, but make sure your wire has a good fillet all the way around, and is centered well in your pads. Don’t let any solder or wire drift off near components.
This should be good for at least what the relay offered, probably more since that relay is about as cheap as you can get.
Assembly is, of course, the reverse of disassembly. Install the board, the ground lug (make sure the flat is lined up properly with the area meant for it,) the screws, and snap the face back on. Do a quick ohms check between all 120VAC connections to verify there’s no shorts, and if good - plug it in and connect it to your smart devices monitor system.
I added mine to my test devices area and got this:
It’s reporting no current draw (other than the dithering these show) and is correctly reporting line voltage. The plug is not “on” as this point, although you can clearly see it still understands the button press. I suppose you could use this as some sort of scene selection if you wanted.
That accomplishes what I set out to do. While there are a few companies that provide non-controllable devices that do the same thing, this is by far the cheapest way of doing it.
One final note, Ikea has announced that they will be discontinuing the ZigBee devices at some point in the near future, in favor of Matter. I assume that just involves replacing the control card, but who knows. Get them while you can!
Disclaimer: Again - This involves working with high voltages and high currents, and is a device that you’re going to plug in to a wall outlet and leave there. Make sure you’re comfortable working with this kind of stuff before proceeding! This is a guide and you need to know what you’re doing beforehand. If you don’t - don’t! Mistakes will destroy property and kill you.
The Home Assistant Green is just a Linux boxen running a containerized version of Home Assistant under a minimalist operating system. Technically, it should be able to do anything that the kernal supports, and one of those things is connecting to a shared drive.
I have a Raspberry Pi that has an I2C air pressure sensor connected to it. Once a minute, a cronjob reads that sensor and writes it to a location on the network - in this case a shared folder on a NFS-connected Synology drive. That file is then available for other programs to use - primarily my own garbage php frontend, and Cacti. Since Home Assistant has a nicer frontend than Cacti, I’d also like to present it there.
There’s a lot of conflicting information on how to do this online, and again - the documentation HA provides is just someone’s thought process. It’s actually fairly easy once you figure it out, however.
For this exercise, I’m using my older NFS connected Synology NAS. It has older versions of NFS opened up to the entire network. I’m not going to go into how to do that since I’m running a pre 5.0 variant, but if you want to do this for yourself make sure you understand how the NFS process works, and that you can connect to it. I’m also going to assume that you know how to access the configuration files in your system.
In order to create this new sensor, there are several steps:
1: Create the NFS share on your target device.
2: Create the share in Home Assistant
3: Allow HA to access the share
4: Create the sensor
1: We’ve already covered this, you need to make sure you can do this on your own.
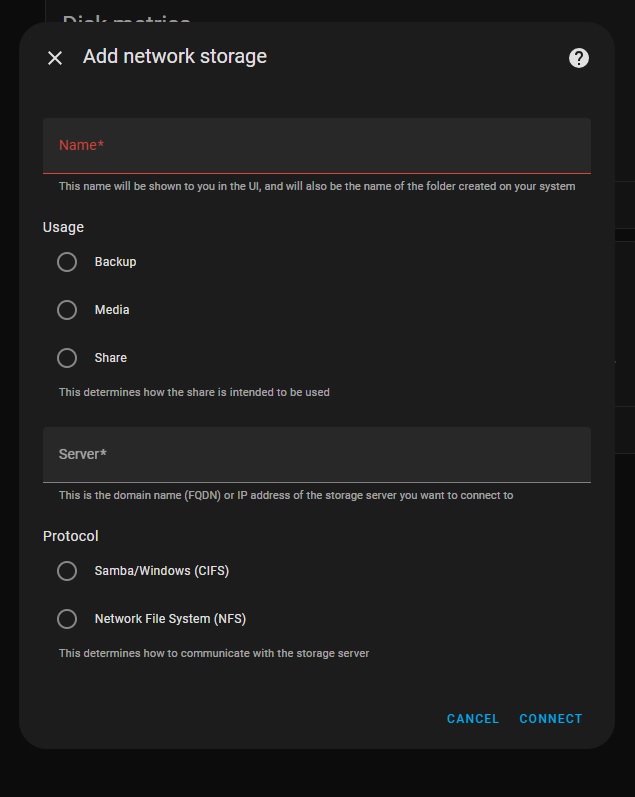
2: Creating a share in Home Assistant is much easier than it used to be. Since a version in 2023, the system now has this builtin to the GUI. To access this, go to:
Give your share a name. I’m going to call my share raspi, because it was originally set up to share files between multiple SBCs on my network. This is the name that the HA process will use when you access it, so make it meaningful, one word, and as short as you can so you don’t have to type a lot of long things. Or, do whatever you like, but I’d suggest keeping it to a single, no-space word. I don’t know how HA handles spaces here.
The next section is entitled “Useage” - this is kind of misleading, as the only thing this does is identify where the share will be located under the HA process. For example, if you choose “share,” your file path will be “/share/raspi” - it’s more of a human readable delineation than an actual “thou shalt only put thine backup here” type of thing. I chose share just because why not.
Next, choose the type of connection you want to make, NFS or CIFS. CIFS is just a fancy name for the type of shares that a Windows system uses, while NFS is the preferred Linux connection method. There’s plenty of info out there on what these acronyms mean if you’re so inclined.
CIFS usually requires a user/pass/domain type thing (Think your windows login and workgroup) whereas NFS can just operate based on IP address limiting. Since I’m using NFS, I chose that and entered my share:
<ip address>:/volume1/raspi
ip address is self explanatory, it’s the address of my share. Follow this with a colon, and the entire path of the share - Synology units call each volume by it’s numeric name, so “volume1, volume2,” etc. My share is on the first disk and is called raspi, which is the same as the name I gave it for home assistant. I’m calling my share on HA and on the remote share the same thing, but you don’t have to. Call it whatever you like within the Home Assistant system, as long as you’re mapped to the correct place on the remote share.
Assuming all is correct, hit connect and if right, it should just do it. Now, on the storage page you should see your new connection as ipaddr/path/to/share. It won’t say this, but now home assistant has mapped /share/raspi to this shared location on your network.
3: You’ll need to allow the Home Assistant container access to these foreign locations, and that involves editing your configuration.yaml file. So load up the file editor add-on (or install it) and navigate to your configuration file. You’ll need to add a new block to your config - I like to do this right before my sensor: block.
What we’re doing here is adding a block called homeassistant: and using the allowlist directive to tell HA it can indeed access these locations that aren’t it’s native systems. I’ve gone ahead and added both the directory I need to access, as well as a directory I can write to later that’s specifically set up for this machine. I don’t know if top-level permissions are inherited, so I just added each individual directory on it’s own. This is pretty much the same format as all other directives in the yaml file, so just follow others if you’re unsure. Spacing is important here!
In my example, raspi is the directory where all the sensor values I want get written, and hass is a directory just for this machine that I can write to and retrieve things from. Create directories as you need them, you don’t need to make extras if you’re not going to use them.
Once you’ve added the directories, use the configuration checker under developer tools to make sure your config is good, then restart the HA process. Allow some time for everything to come back up and populate the new fields. The share seems to persist through this, so you should be good to leave it alone.
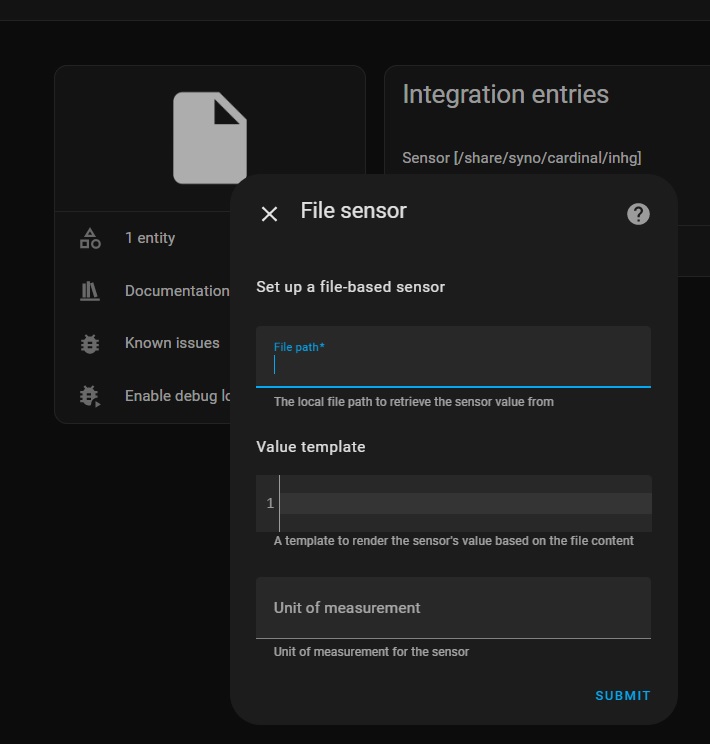
4: To create a sensor, you’ll need the file sensor with the “file” integration. To do this:
setting (gear icon) > devices &services > add integration
     > file > set up a file based sensor
Search for file in the integrations list
You’ll get something that looks like this:
Fill out the form with your sensor (entity) information.
File path is the HA path you set up, in this example it would be:
/share/raspi/airpress.txt
where airpress.txt is the file we want to read. You’ll need to call this whatever you’re trying to read. This should be a single value with no other stuff attached.
Template is the yaml code you want to use to process the value you read. Since my value is already what I want, I left it blank. You may need to change that - yaml code is beyond the scope of this document.
Unit of measurement is just that. It’s just an identifier and only means something for you. In my case, I chose inHg since it’s air pressure. You could call it chickens/hour, °Quackenbush, or “Bob.” Whatever you like. Hit submit, and it should create a new entity creatively called “file.” Click on the entities link, then click the new “file” entity, and edit so the name means something using the gear icon.
You now have a new sensor populated by a value that you can manipulate like any other sensor.
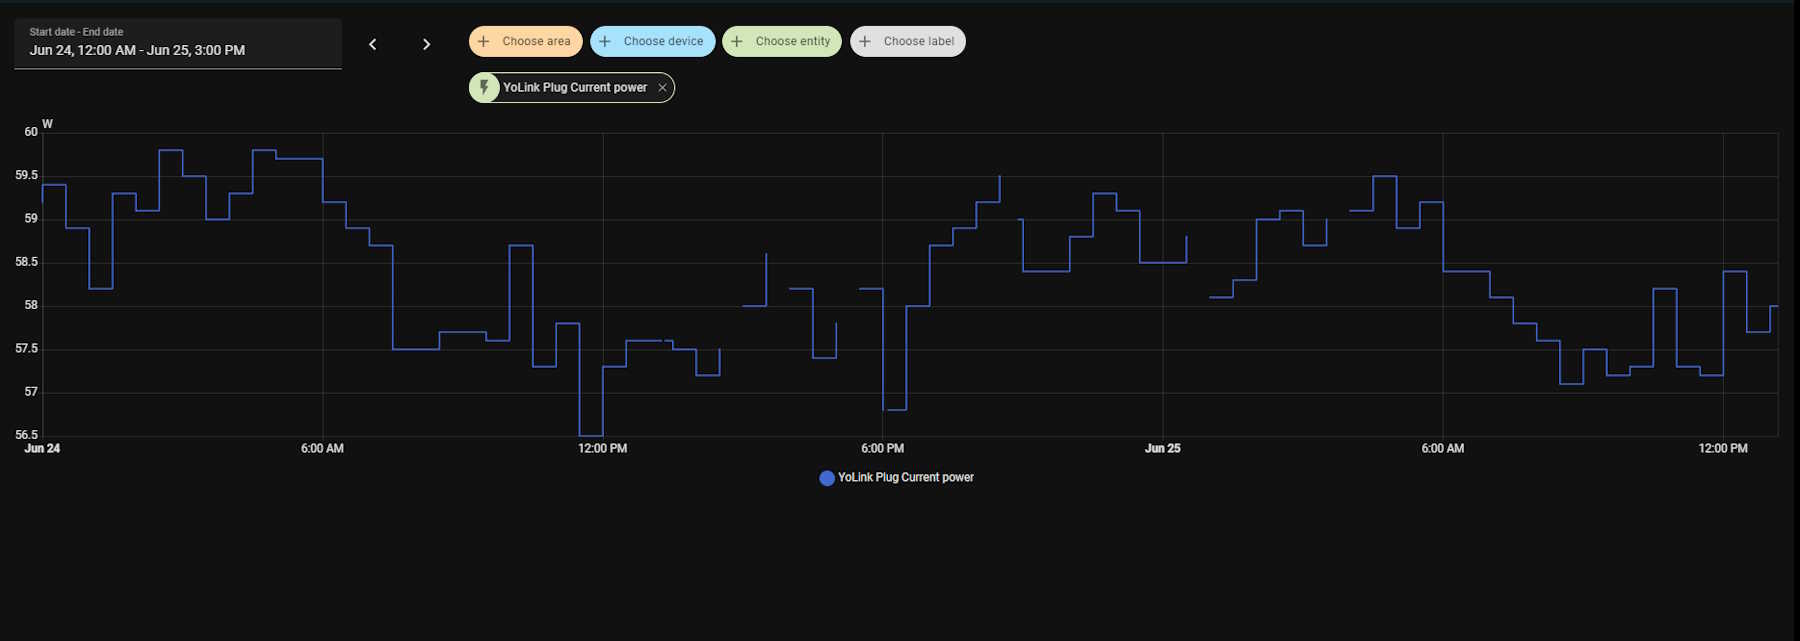
One of the things I noticed almost immediately after setting up the HA Green unit I purchased was that anything that required Internet - weather cards, electricity useage, devices integration, even logging in - was very flaky and had a lot of dropouts. I wasn’t sure what was going on, but it got to the point where any Internet-enabled integrations were basically unreliable.
This chart is from a YoLink device - HA talks to the YoLink service, and populates data based on what it receives. Notice all the missing data in the middle?
That’s time when the card wasn’t available in the overview. This also was corresponding to time when the weather cards and other stuff was not available. Checking the logs, I saw that there was a number of messages about being unable to resolve addresses and failed DNS lookups.
After doing some research on this, I find that the HA container seems to get it’s DNS resolution from a service built in to the HA system itself. It then uses this to populate /etc/resolv.conf with the proper nameservers.
In order to get to that service, you need to access the actual shell of the HA system. You can do this by adding the “Terminal & SSH” add-on from the store. Once that’s installed and started, launch it from the Web UI and type the following:
Theoretically, it should get DNS from the router (192.168.1.1) like any good device should. But it doesn’t seem to, and this has been broken for a long time from what I can tell.
To insert DNS servers into this file, you’ll need to enter a couple of commands:
ha dns reset
ha dns options --servers dns://8.8.8.8 --servers dns://8.8.4.4
ha dns restart
(I think it should go without saying that you’ll need to be admin or owner to do this.)
Enter as many DNS servers as you like. The example shows Google DNS. Google is Evil in a box, but their DNS does work well, and you’ll probably only need that. I entered a couple more as well just to have some redundancy.
I did do a reboot on the system, just to make sure. After that, /etc/resolv.conf now showed my new DNS servers, where none had existed before. You can check that by going back to the terminal and entering:
cat /etc/resolv.conf
You should see your new DNS servers.
This took care of all of the problems for me - HA now returned the UI much quicker, and no cards are going offline. Will this persist through an upgrade? I don’t know, but my system is in a known state and unless I need some of the new features, I’m not planning on updating with every new version that comes along.
It does seem to persist through a core upgrade. Not sure about an OS upgrade yet! It does persist through OS upgrades.
As a note: Some have reported that this did not work for them, so there are certainly other issues at play here. YMMV!
Home Assistant does (now) offer the ability to add DNS from the GUI, so you may want to check that out first. I used this solution because it was the first one I ran across that seemed to have positive results.
Recently, I decided to give Home Assistant another try. I had have given it a go in the past, but at the time it simply didn’t give me enough functionality to be “worth it.” Now, with the proliferation of cheap zigbee and LoRA sensors, I decided to see what it can offer.
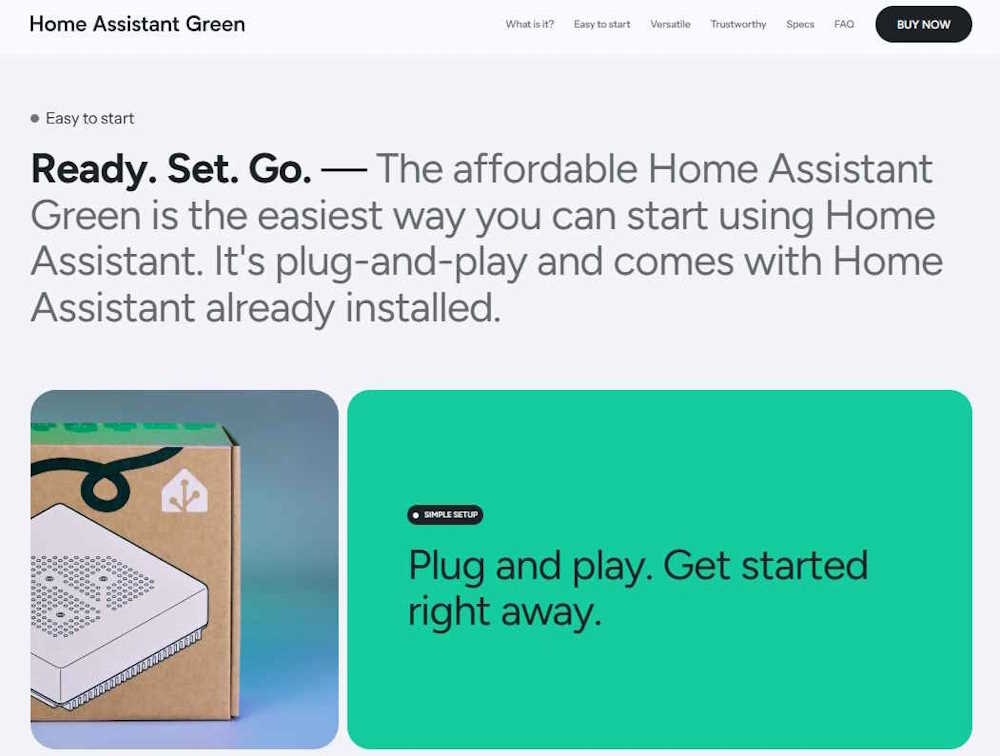
To facilitate this, I purchased an official Home Assistant Green CPU with the official ZigBee dongle. Why? Well, here’s what the website says:
Ready. Set. Go. — The affordable Home Assistant Green is the easiest way you can start using Home Assistant. It’s plug-and-play and comes with Home Assistant already installed.
Here it is on the site itself, as of February 26 2025:
All cool, right? Remember that it’s already installed.
So, I order from a company that I’ve dealt with before, and a week later it shows up on my desk at work.
I read the little booklet inside the box. It apparently has to be connected to the internet in order to work the first time. Why? Well, remember that little bit about the OS and system being already installed?
It’s not.
It has to download an install it from github. So the very first thing I encounter is that it’s not actually like it is on the website. It, in fact, is not already installed on the device. It simply has some sort of bootloader stub that captures the image and installs it. No indication from where, no indication of how long it might take, nothing. The lack of information here is disturbing.
I plug it in, apply power, and walk away to make something for dinner. A while later, I come back and hit the indicated webpage on the device, and all I get is a big screen telling me that the system failed to install. There’s a log, which I grab and copy here: https://pastebin.com/gdYK38d6
I comb forums, make posts, contact the vendor. The vendor is very responsive, but can’t really offer anything except that they’ll take it back and try to flash it themselves. I get no reply from forum posts, but there are plenty of other people who have the same issue. The creator of the Home Assistant system only indicates that I don’t have an internet connection.
I wonder how the software downloaded and tried to install. Must be that wireless wire I hear about?
Anyway, after spending the better part of half my day on this thing, I set it aside.
Something occurs to me. It says look closely at the log. And there it is:
[supervisor.dbus.timedate] No timedate support on the host. Time/Date functions have been disabled.
[supervisor.host.services] Updating service information
[supervisor.host.sound] Updating PulseAudio information
[supervisor.host.sound] Can’t update PulseAudio data: Failed to connect to pulseaudio server
[supervisor.host.network] Updating local network information
[supervisor.host.apparmor] Loading AppArmor Profiles: {’hassio-supervisor’}
[supervisor.utils.whoami] Whoami service failed with SSL verification: Cannot connect to host services.home-assistant.io:443 ssl:True [SSLCertVerificationError: (1, ‘[SSL: CERTIFICATE_VERIFY_FAILED] certificate verify failed: certificate is not yet valid (_ssl.c:1000)’)]
[supervisor.core] Whoami service SSL error
[supervisor.core] System time/date shift over more than 3 days found!
[supervisor.host.control] Setting new host datetime: 2025-02-21T17:58:06+00:00
[supervisor.core] Fatal error happening on load Task : Automatic time synchronization is enabled
[supervisor.docker.monitor] Started docker events monitor
[supervisor.jobs] ‘Updater.fetch_data’ blocked from execution, no supervisor internet connection
Pay attention to the things about time, then go down to the part in the middle about certificate verifications. The SSL cert onboard is in the future. That tells me the time onboard is wrong, in the past, and probably whatever the hardware gave the Home Assistant install process! Only then does it check the time, and yeah - it’s way off. After that, it’s all failures because the SSL checks failed. Of course the supervisor doesn’t have an internet connection, it’s certificate is invalid because the device didn’t check the time.
Why didn’t the Home Assistant install process check the time first thing, instead of in the middle of the process? I don’t get that at all.
There’s a reset procedure. It wipes the drive. I try that. No luck, now I don’t even get the failed install web page. I try it a couple of times, no luck. Forum posts suggest seeing what’s on the screen, so I connect a monitor to the device and find that it’s sitting at “Waiting for Home Assistant CLI to be ready.” It never “becomes ready” so it dumps me into an emergency console which doesn’t really give me much power.
I do notice that there’s a message about the wipe process failed in the boot messages. Hmm…
There’s a “You can flash this with an SD card” procedure. I try a couple of different SD cards with several different flashing tools. None of them work. It just tries to boot normally.
I’m at a loss, and running out of patience. The vendor has agreed to take it back. I set it aside and sleep on it.
So why didn’t this thing get the time from the network. Is it trying to get it from my router instead of outside the network? That can be an issue. I run a Mikrotik router with RouterOS6. It doesn’t offer the time by default because Mikrotik’s philosophy was that your router isn’t a clock. You can’t depend on the router being correct. You want a clock, get a clock. It does have an internal SNTP package, but that wasn’t really doing much because I didn’t care. The router routes packets - it doesn’t care if it’s 2011, 2025, or 2100. It just routes packets.
Mikrotik does offer a NTP package that can serve time to the local network. I install that, set it up, and verify with “ntpdate -q 192.168.1.1” that I’m getting a response. Ok.
I try to boot again. Nothing. Reset - still giving me the can’t wipe error. SD card flash, nothing. I notice some jumpers on the board itself, and decide to go for broke and open the case. I’m sure the warranty is now void, but it’s going to be void when I hit it with a crowbar. But, I digress - there is indeed some headers, one has a jumper, and it’s marked “NOR / REC” and is in the “NOR” position.
Normal and Recovery? There’s no information about it. I move to “REC,” apply power, and…
I see the machine downloading the OS and installing. All of the error messages about kernel time synch that were there are gone, indicating that it indeed was trying to get the time from somewhere. It installs, powers down. I put the jumper back into the “NOR” position and boot. And there we are, the Home Assistant setup and login appears.
I put it back together, let the vendor know, and write a WTF Man? letter to the creator of Home Assistant, a company called Nabu Casa. It seems to be working just fine.
So WTF Man?
When I emailed Nabu Casa originally, the only thing they said was “You don’t have an internet connection,” completely ignoring the fact that I indeed had an internet connection because the software downloaded and tried to install. That was worthless. When I was done, I emailed them and told them what fixed it - no response so far, nor do I expect one because, while I wasn’t necessarily impolite, I wasn’t holding back either.
To me, it looks like this device expects your router to provide a correct time. If it does not, or does not provide the time at all, it fails silently and even the manufacturer doesn’t know this. They simply assume that your device is their device and all devices act the same. Forum posts that had this same problem were solved by taking the Green unit somewhere else and trying again - it works, probably because they now had the right time. Others indicate they had to mess with DNS setting in their router - was that the fix or did changing those (and the subsequent restart) simply force the router to properly update the time? Probably yes, a little of that and a lot more of this.
The vendor, while extremely responsive, wasn’t a software troubleshooter and could only offer me help with the hardware. They could attempt flash or give me a new one.
So the TL;DR here is make sure your router can provide the correct time, otherwise - you’re in a world of hurt!
But one last thing here - why didn’t the reset process complete, and why couldn’t it wipe the drive? (This may also be related to the flash failure.) It seems, from the posts I’ve read, that if something fails and the drive doesn’t get into the exact expected state, the wipe process doesn’t know what to do and fails. That’s extremely fragile, and I don’t understand why it does that. I will assume that it’s only wiping the portions of the OS that contain the Home Assistant containers, and if they aren’t there (in some cases I’ve read where the drive name being wrong causes this!) it just fails. It doesn’t stop, it just continues to boot and destroy itself more. Same with the failed install process - it just keeps going and destroys itself.
My advice to Home Assistant?
The time is obviously very important, since you’re using self-signed and served SSL certs. CHECK THE TIME BEFORE STARTING THE INSTALL PROCESS - If it’s before 2025, STOP. The system does not have the correct time. Or, check to see that it’s within the range your certs are good for, you’re providing them so you know the dates!
If it gets into the SSL process and one of the SSL checks fails, STOP. Since this is important to the supervisor that runs Home Assistant, continuing will only cause problems.
You need to explain what’s going on better, how long you expect things to take, and what that jumper is for inside the case. You need to explain certain things like it’s not installed, and that you need the correct time on your router before continuing.
Last, the install process is way too fragile. This is a consumer device, if you’re not able to recover from a simple bad install without using unpublished information you’re doing it wrong.
Final thoughts
If you’re planning on getting one of these for yourself, do yourself a favor and make sure you have a good, wired internet connection and your router can provide the correct time.