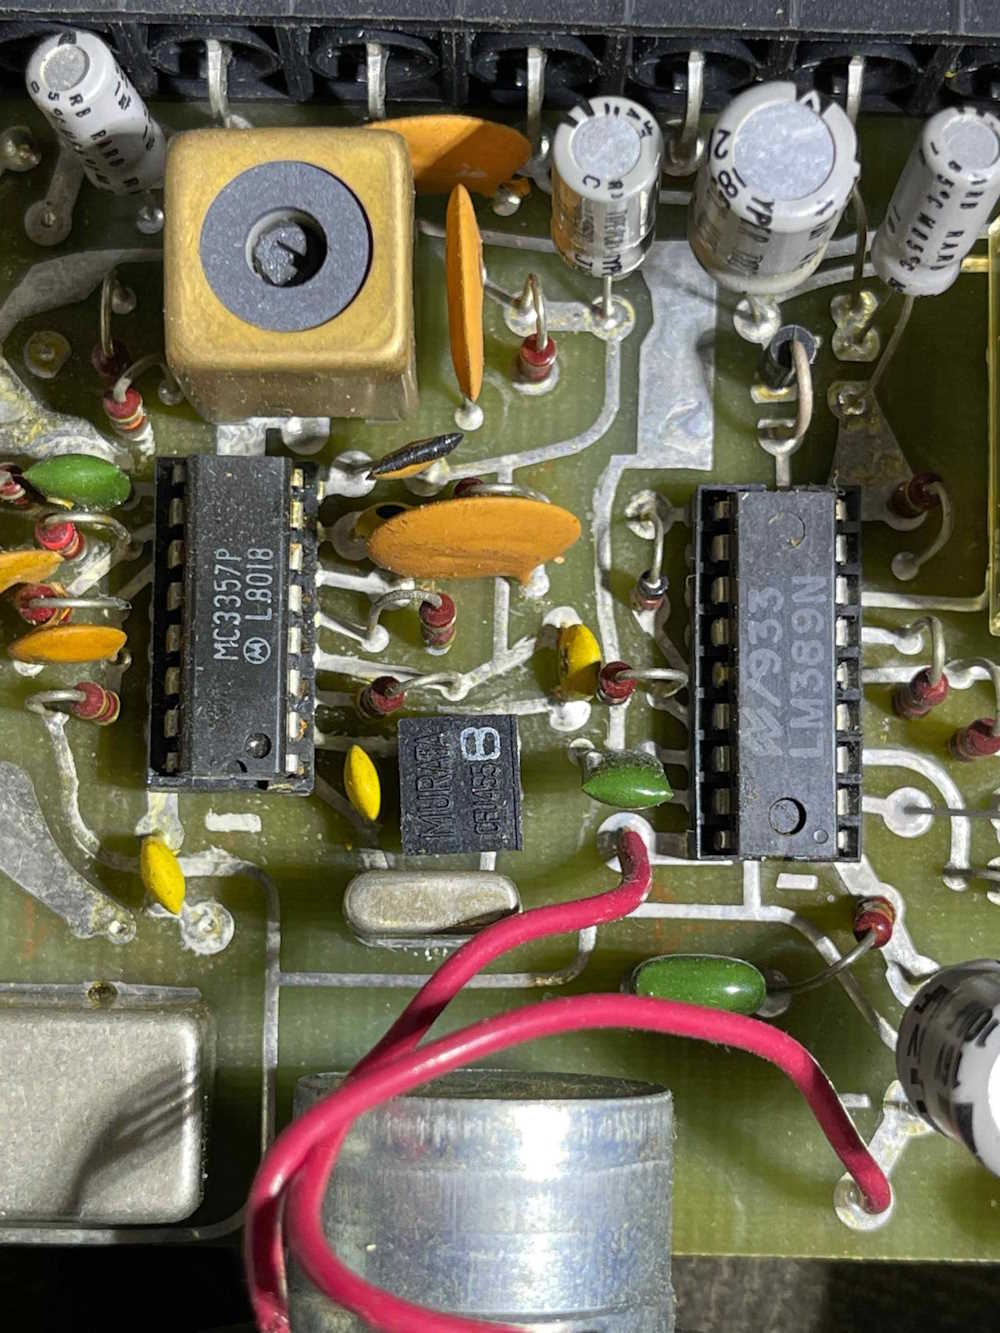
It’s always interesting to open a device and see ancient chips you’ve never run across before. The LM389 is a LM386 with three transistors for RF, IF, and 2nd IF on the substrate. This ancient commercial weather radio uses one for it’s audio final, if I want to keep it in operation it’s probably best to find a couple of spares along with the MC3357 IF chip next door. This device was made in the USA, even the circuit board was made right here in Ohio as evidenced by the GE Textolite “T” in the substrate of the board.
It’s well built, but the electrolytic capacitors with the long leads surprise me. I would think for a device with RF floating around inside, you’d want to keep those short.
It needs a new power cord, the old one is short and worn, as well as some DeOxit sprayed in the controls and switches. I may also replace the power supply filter capacitor, but that’s only because it was laying against the regulator for untold years and has a nice discolored spot on it.
This is part 3, and the final part of working with this radio. It didn’t turn out as good as I’d hoped, some of the other capacitors are leaky - and some of those are in a couplet. The customer just wanted it to make voices come from the air, so I’ve left it at that for now.
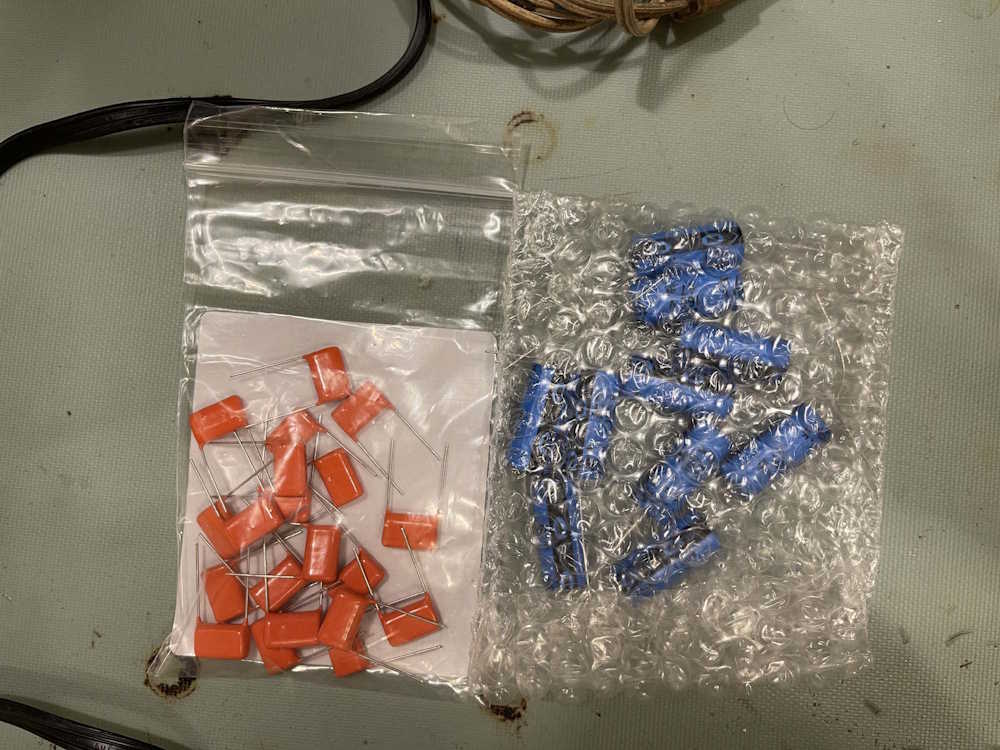
The original diagnosis I came up with was bad filters, and that was the case. The original electrolytic capacitors were bad, and were simply acting as opens instead of capacitors. The device in questions was a dual section, wax sealed tubular device, consisting of a 50uF and a 30uF part. I chose to replace them with Cornell-Dublier 47uF capacitors, which should be good for another 50 years. The across-the-line capacitor also got replaced with a Vishay 0.047uF @ 600VDC device. Just as good as the original without the bumblebomb problems.
The parts, fresh from Mouser:
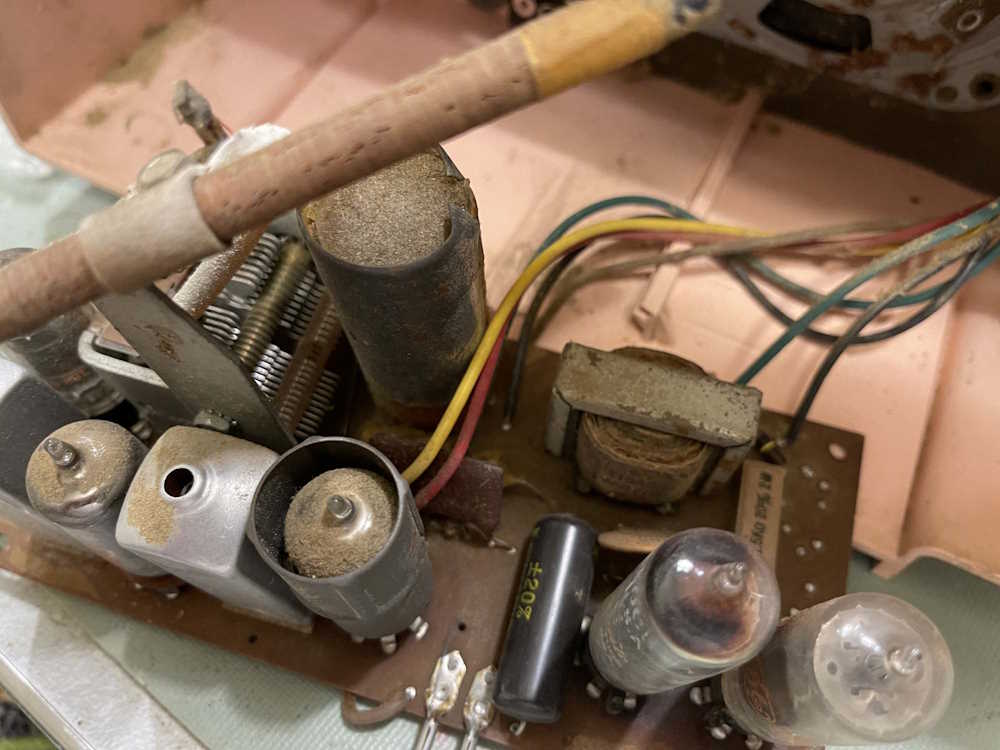
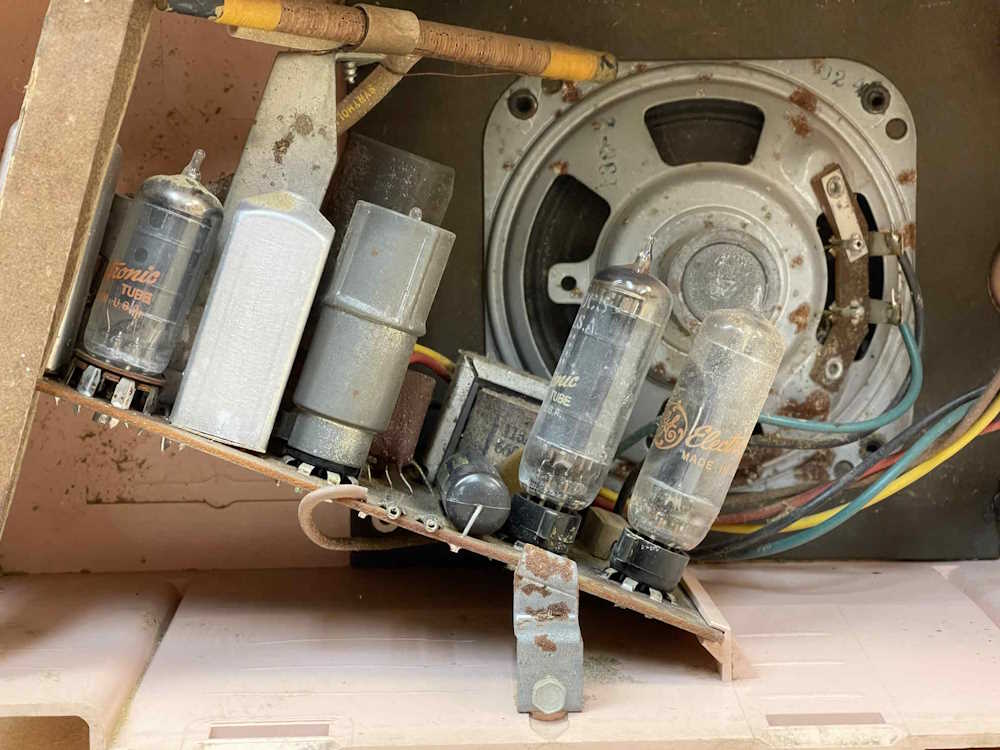
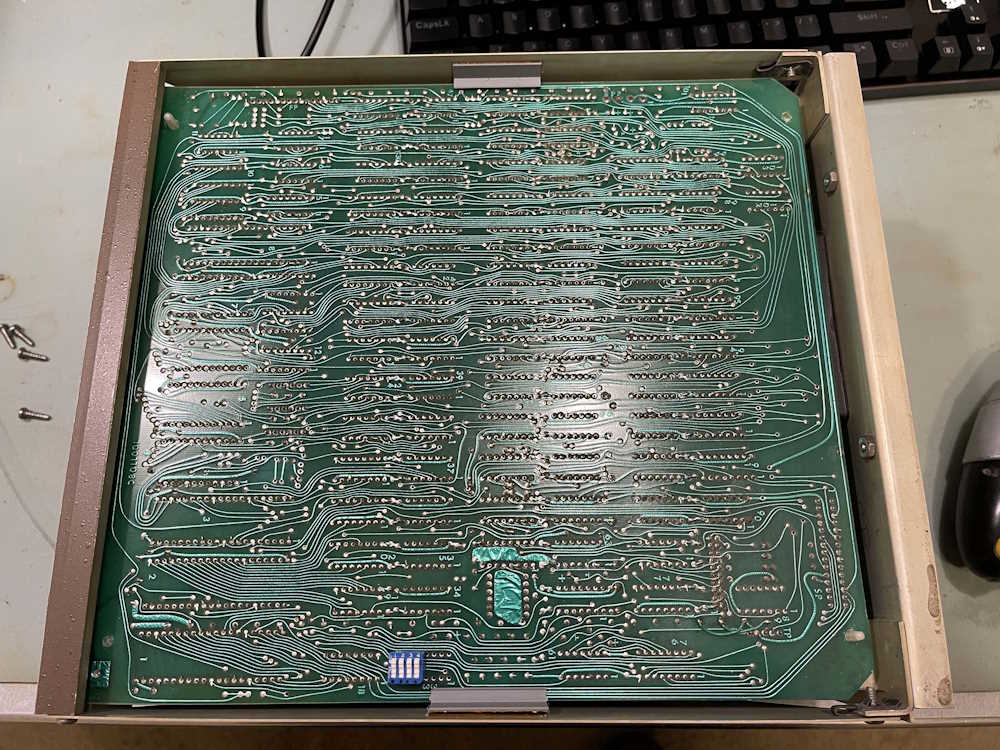
What we’re working with. The black tubular part in front, and the metal cased tube in back are the suspects. If you look in the middle of the board, you’ll see a reddish-brown rectangle That’s the couplet, and was a cost-saving multi-part unit. When they go bad you rebuild what’s in them…
Other problems reared their head as it was being taken apart. The biggest is the age of the plastics. The knob used a metal band on the plastic to tension it on the shaft of the tuning capacitor. Pulling this knob from the shaft left the tension band on the shaft (it had little ears that were probably used during manufacture as an install aid,) and the plastic is so brittle and dried out that it just crumbles to dust. There was enough left to put it back on, so I broke the ears on the band off and replaced the tension band and said “Don’t touch this again” to myself.
The other bad thing, and something I didn’t notice before, is the speaker had a tear. The paper was so rotten it felt like wet tissue and just kept tearing itself. Well, it still works, and this can be replaced easily enough if desired.
So, on to the repair. It was a simple matter to desolder the parts, the heavy copper on the board let it’s old solder go with a 35W iron and some wick. The parts pulled out easily and the board cleaned up well.
You’ll notice the board is discolored. That’s where the 50C5 power amp tube sits, and it gets toasty. The solder joints are exhibiting potential cracks, so they all got touched up.
The parts I installed were much smaller than their vintage counterparts, so they got bent leads to sit down on the board, and were just placed in the board. I wasn’t going for a beauty contest here, they need to be in there solid and electrically correct. You’ll notice the one electrolytic is offset a bit, I realized after I put one in that the banana slicer had one section larger than the other. Oops…that other part goes in the parts bin.
Yes, that’s not really a safety cap. But this device isn’t going to be used. It’s purtyful.
For the filters, I just jumped the two together with a loop, looped a piece of bare wire around the common and soldered it all together. The original capacitor was full of old wax and wasn’t being rebuilt.
It was all back together…but there was still no joy. The filters took care of the buzz, and the output was nice and strong - then it started to fade and get fuzzy as something started leaking. One of the coupling capacitors or other small filters on the plates is probably leaky and drawing things out of tolerance, or a tube is bad. On a whim, I tested a few of the tubes, and they seem ok, so it’s probably one of the capacitors. With some being in that couplet, that’s more of a job that a “I’ll take a look” can cover.
That 50C5 is probably bad, however. They can exhibit exactly what is going on when they get really old and near the end of their lives.
It goes back the owner this week, if they want more repairs that’s a different proposition. Some of the younger members of that family are starting to get into electronics, perhaps this is a good project 15 years down the road.
Beyond that, it’s really not cost-effective to repair something like this for someone else unless they understand it’s basically a replace everything deal.
I just noticed that the Breezeshooter’s club in PA is holding their annual hamfest again this year, after several years of everyone’s television saying we were all going to die.
While the details are scarce, it appears to be happening the first weekend in June (3rd and ?4th?) - this has always been a good show when I’ve attended, and has a lot of good deals and eye candy. I’ll post more details as they become available.
A short update: I decided to just order some good quality parts from Mouser instead of trying to pick through the junk at a show.
While they’d probably be cheaper at a show, the three parts I need to get this radio playing cost less than $7, and that’s just because I decided to go a bit higher in quality than absolutely necessary. I should have them in hand Friday, and it won’t take long at all to get them installed.
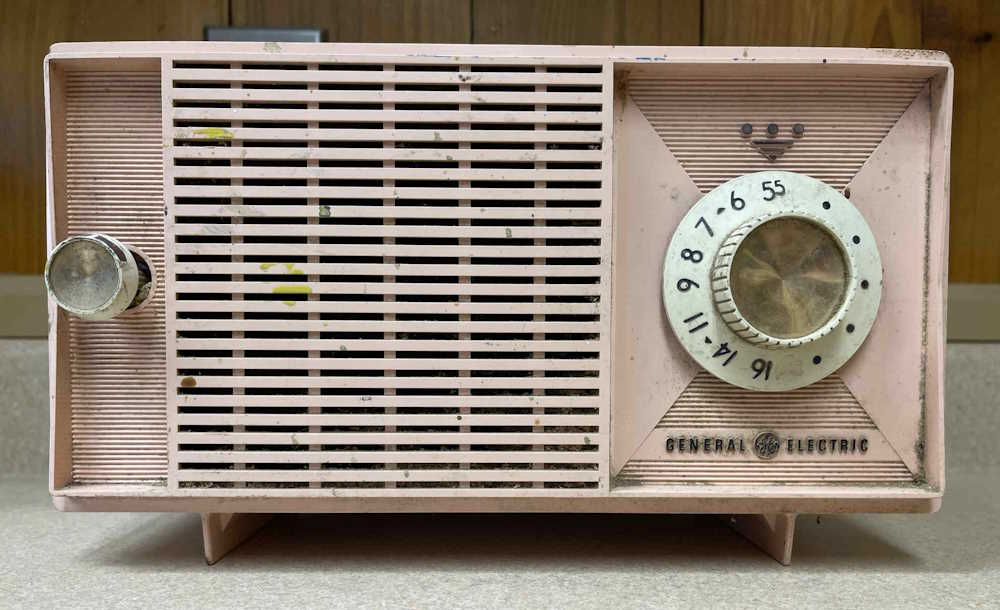
This is a radio a co-worker rescued from a barn sale, and wanted to know if it could be made to work again. The T-125A was manufactured between 1958 and 1962 (or 1963, depending on who you believe.) It still has the civil defense markings on the dial, so this radio was probably one of GE’s last radios to have this marking.
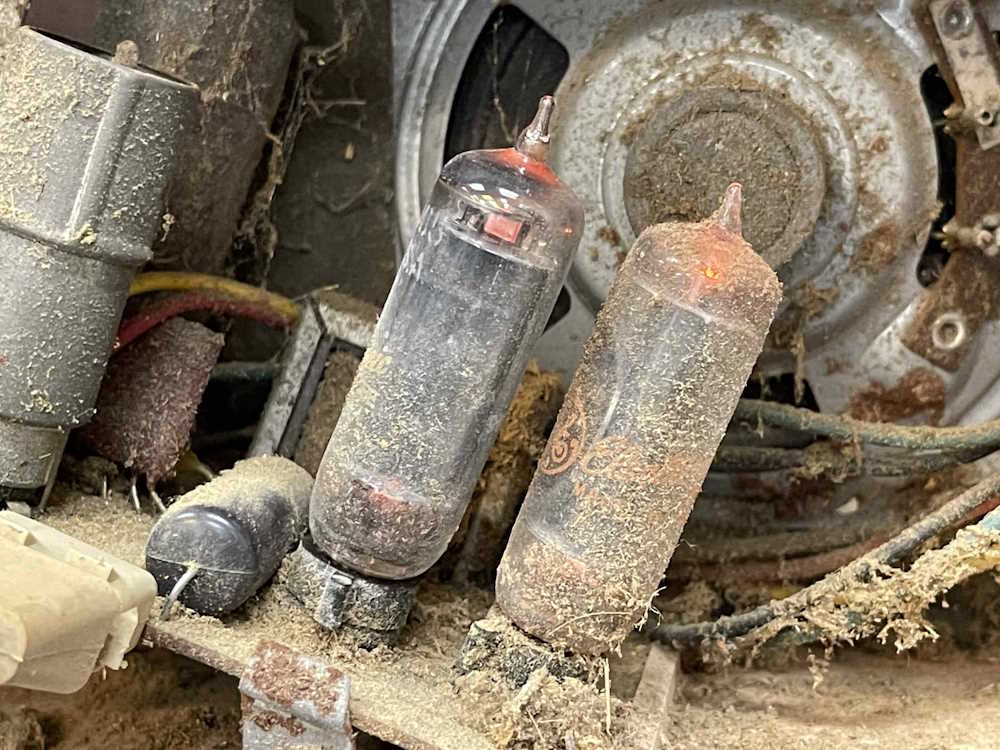
The radio apparently spent the majority of it’s life in a woodshop, and it shows. While the case plastic is in excellent condition with no chips or cracks, it’s stained with various wood coloring products. Back and original cord are present and intact, although the cord is getting stiff. It, however, exhibits no cracking so it will get left as-is for now. The inside of the radio shows you where it was for most of it’s life, being coated with wood dust.
Since these are simple inside, there wasn’t any need to grab an isolation transformer or variac, just plug the thing in. The worst that would happen would be the across-the-line capacitor would pop, so…
It exhibits exactly what you’d expect. A loud 60Hz hum, so the filters are bad. That was completely expected. It’s a dual section filter consisting of a 50uF and a 30uF capacitor, so I’m simply going to get two 47uF @ 150V caps and replace it. The across-the-line cap is .047uF at 600, it will be replaced with something similar. The only other suspect item would be the coupling capacitor between the detector and the power amplifier, so it will probably get replaced as well. The grid capacitors could be eyed with suspicion, but I’m going to leave those alone unless they show problems. One is in a couplet, which would require rebuilding the device if it’s bad.
The owner simply wants it to play long enough to go “Hey, that’s cool.”
A quick cleaning with a paintbrush and some canned air got rid of most of the dirt:
So it’s ready to repair. I’ll pick up some parts at the next few hamfests I attend.
One interesting thing about this radio is the 50C5 power amp tube. It has different color writing, so I assume it’s a (genuine GE) replacement tube. It still has something interesting about it - the getter is black. I can’t say I’ve ever seen one like this without the tube being red-plated. I have to assume this radio was on for most of it’s life. Pretty cool.
Off to a show for parts. Check back later for results on this radio.
As much as I’d like to make it to the Toledo show, that may not be possible this year due to the drive. I’m still going to try, however.
In the meantime, I may try to get to the show in Dover, OH at the fairgrounds. According to the information, this is their first show since 2019, so people may be itching to get out and bring their junk out for sale.
TUSCO Amateur Radio Club Hamfest
Sunday, April 22nd, 2023. 8A-1P
Tuscarawas County Fairgrounds
295 South Tuscarawas Street
Dover, OH 44622
The flyer notes to enter through the Tuscarawas Ave gate.
This is the second (and last?) part of my cleaning up StatusNet. This deals with removing some of the main page identifiers. While this isn’t hardening, it obscures the doorway just a bit, and hopefully drive-bys will just look at it as a not very worthwhile target. It also removes links to things that aren’t what they were when the service started, so there’s less chance for a user to click on something that may now lead to a malicious site.
This does remove some of the boilerplate regarding the GNU license status, among other things. While I don’t like to do this, StatusNet is so old that there are probably no new installs happening, as it won’t run on modern PHP. If you’re running this commercially, you may be obligated to leave those license notifications alone, so use your own judgement.
***
Here’s the original assets, and what we’re going to change:
The first thing I like to do is get rid of the dead link to status.net, and the link to wikipedia. The first isn’t necessary because status.net is just a garbage page full of SEO grabber links, and the second both because I don’t like some of Wikipedia’s practices and you hopefully know what microblogging is now. The term itself has passed into the legend of Web 1.0, so it’s not even a relevant term these days.
(I assume you’re comfortable with your webserver and know where things are. No warranties are expressed or implied, it’s up to you to make sure you’re doing this right.)
Start by making a copy of websiteroot/actions/public.php, and then open the original for editing. (Always back up your original, just in case!). Move down to the very bottom of the file. You’ll see this:
And when we’re done, it will look something like this:
To change the header box in question, edit the ’showAnonymousMessage’ function to say whatever it is you want. Use this as a guide, essentially you’re getting rid of all of the links and creating a static header that shows regardless of the other options chosen for the site. That’s why it’s duplicated in the ‘if’ block.
Since the site in question is TheDoghouse, %%site.name%% will show that, followed by ‘Woof!’ - you don’t have to use the variable here, and you can put anything you want in the block as long as it can be printed. I chose to use a simple message that will show “This is TheDoghouse. Woof!” on the main screen where the description about StatusNet and the service description lived. The variable originally used was left intact for this step.
The next edit is just to reduce clutter. In the block directly above the one we just edited is the sidebar links. I edit those out so, while they still are there, the function to actually print them on the screen is commented out with #. This isn’t necessary and doesn’t really offer anything, it’s just something I like to do. The base skin for statusnet will show the same size box, but other skins will reduce the amount of space used based on how much or little you comment out.
Here’s what it looks like by default:
This gets rid of the “Popular”, “Groups”, and “Featured” links on the main page. While they are still available, to me and my private site it’s just unusued cruft. So away they go. I didn’t delete them in case I want to re-implement them, the function block simply doesn’t show what has been placed in the variables. Similarly with the site name, I left the if/else case alone so later edits will be less painful if certain functions need to be restored. But that’s why you made the copy, right? You did make a copy, right?
But there’s nothing preventing you from putting whatever you want there. Just replace the variable with whatever you like and let the show function print it for you. (I suggest you check out some basic php stuff before going crazy!)
Save your edits, and check that permissions and owner of public.php are correct. Since you created a copy, it’s probably now root, so change that back to whatever your webserver uses as it’s username. load your site up, and you should see your changes.
The next, last, and other thing I like to get rid of is the footer, and all of it’s links. This shows up on every page regardless, even the main page. While again, this does contain license information, many of the links are dead and the version number of the service is present. As before, there are probably no new installs happening, so having this information isn’t terribly useful. It exposes things that could make it (ever-so-slightly) easier to probe for entry, so it goes away. Again - this isn’t hardening, it’s simply covering up the door so the curious passer-by hopefully doesn’t see it. The microblogging term stays here, but be careful of your license requirements.
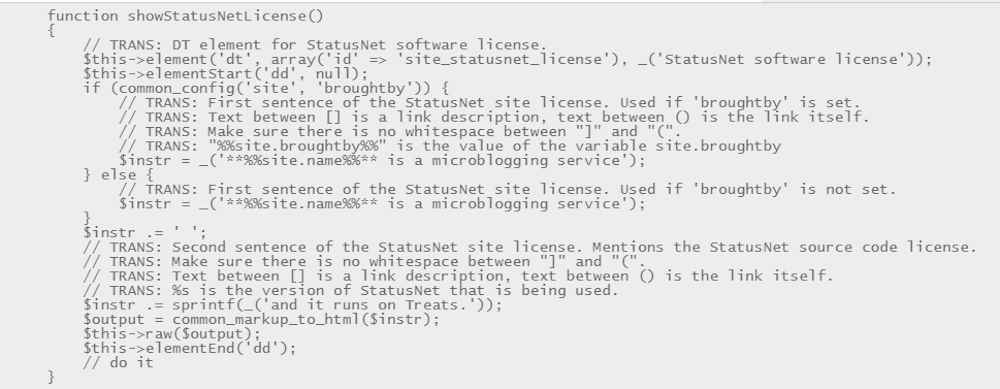
For this, navigate to websiteroot/lib/action.php. Make a copy, and edit the original. Navigate to showStatusNetLicense, and you’ll see this:
What gets shown is dependent on if you have the “Brought By” line filled out in your config. But I don’t care about that, as before I’ve left the if/else cases alone so they can be reverted easier, if necessary. All of the “runs the” information is gone, as is the license, and the service shows the same information regardless of config options.
The last thing I like to get rid of is the set of links present at the bottom of every page. My site is private, so some of those are not useful. The rest are dead links, and like the now defunct status.net page, may lead to something unsavory. Those are fairly easy to get rid of, navigate to the showSecondaryNav function in action.php and simply comment out the block.
Here’s the original:
And my edits:
Everything is commented out except the first few and last few lines, which give the function something to do when called. Other than that, everything else is ignored.
Save your edits, make sure permissions are correct, and check your site.
That’s it. Your main page now does not show much information about what this is, other than StatusNet.
Troubleshooting: If you’re having some issues where you are now getting a 500 error, check your permissions. That’s probably going to be the main issue here. Also check that you’ve used the correct syntax in the code, variables are always enclosed with %% %% and lines must end with a semicolon; Beyond that, copy your original file over the edits and try again. I found out by trial and error, so don’t be afraid to play with stuff even if you don’t understand 100% of what it’s doing.
There are a few other things you can do inside the service to remove unwanted things like maps (that don’t work,) but I’ll cover those in a separate article.
2022 was kind of a moderate year in regards to the hamfests I was able to attend. While it started off strong, weather and a bad cold given to me by a sick building and sicker co-worker prevented me from going to anything later in the year. This year, I plan on making up for it with a few new shows and a bunch of regulars - as if I need to bring home more junk.
I only have a few devices in my wish list this year, and those are mostly “Get them while you can, because they are getting scarce” devices, including a decent tube tester as well as a couple of particular types of radio.
The list of what I’m planning to attend follows, and if you’re interested in this stuff at all, go check them out. Other than the Toledo show, I’ve been to all of them in the past and can give them a Grade-A recommendation. They may not be as big as Dayton, but there’s always good stuff to be found.
Some of these announce later in the year, check their links in April or so.
Saturday, April 15th - Cuyahoga Falls Amateur Radio Club, 8A-1P.
48 E. Bath Road, Cuyahoga Falls, Ohio 44221 http://www.w8vpv.org/hamfest.php
Friday, May 19th thru Sunday, May 21st - Dayton Hamvention
120 Fairground Rd, Xenia, OH 45385 https://hamvention.org/
Date TBA, Usually a couple weeks after Dayton - Breezeshooter’s Hamfest
1127 New Castle Rd, Prospect, PA 16052 https://breezeshooters.org/ns/hamfest/
(This one was cancelled last year for unknown reasons.)
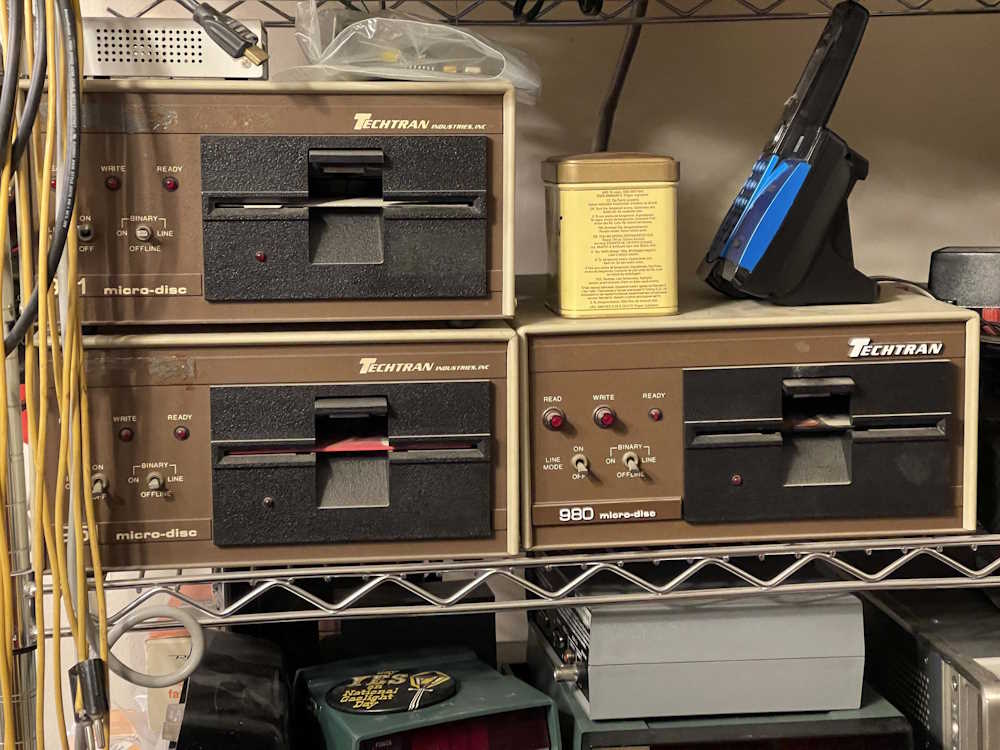
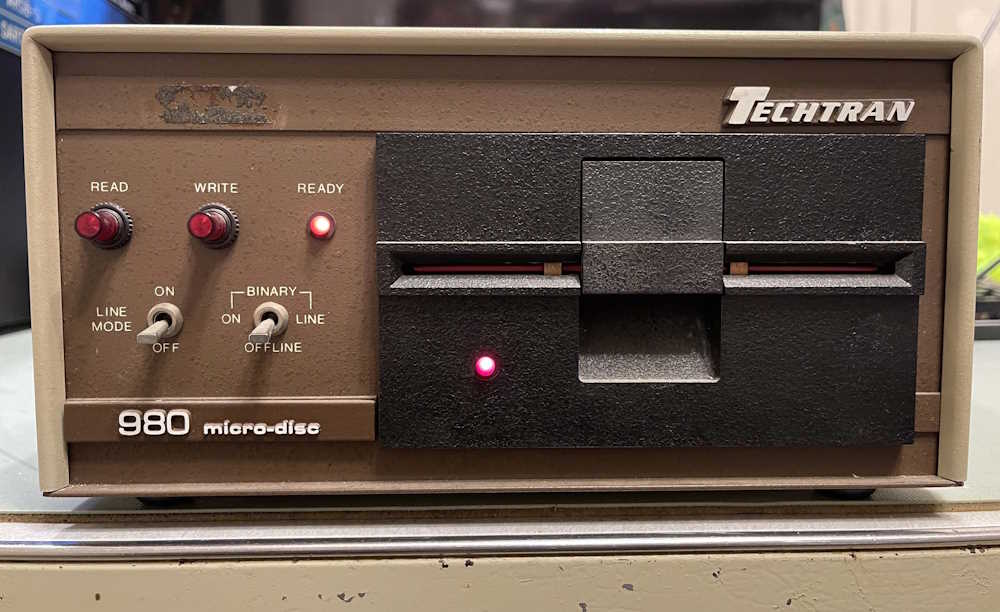
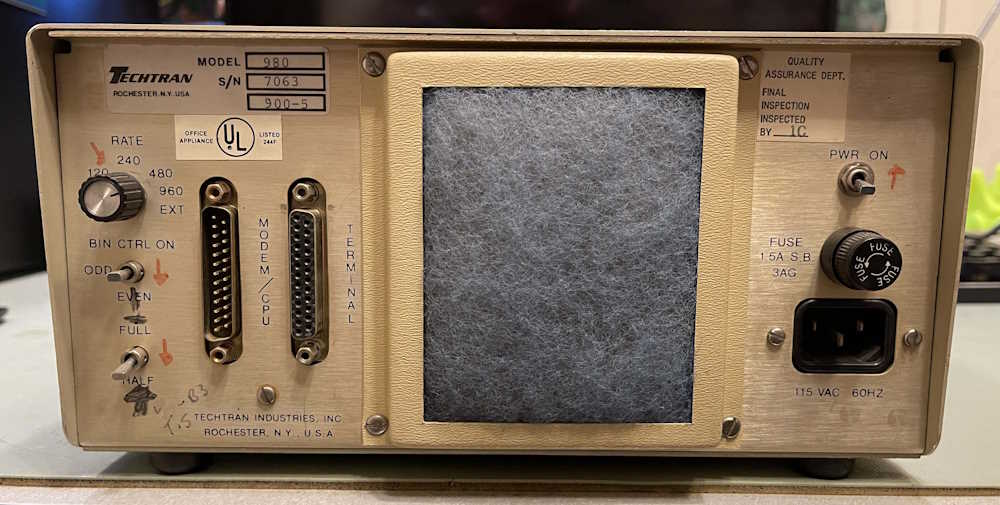
One of the devices I’ve had kicking around the shop for years are these TechTran 900 series standalone disk drives. These were the main storage medium for a large test platform at a former employer. They would provide commands to a computerized telco switching frame in the form of responses to a “Read next record” command. When the project finally ended, I asked the project engineer for the drive. Turns out there were 4 units, with manuals and service information.
So, it’s a disk drive?
These have two modes. First is a “File” mode, which works like you’d expect from a mass storage device. You create a file, write to it, then read it back. It also has a “Record” mode - instead of writing files with a directory, these store records, much like a punch card would store a piece of information that may or may not be part of something larger. You would write and read records - bits of text - in sequential order.
The unit does this via a RS-232C interface, using text commands. The device can operate in standalone or passthru mode, and has all the normal serial settings you’d expect - except everything is done via switches that control what is literally a box full of 74LS chips.
How does it work?
Because the device was expected to be continually available while in operation, the manufacturer set these so the disk spins at all times, and the device loads the head on to the media whenever an operation is requested. This has the effect of only requiring the time to drop the head and wait for the record of interest to arrive at the head before the operation is completed. Normally, a drive would spin up, perhaps drop the head on the disk after it was spinning, seek the correct record in the directory, and then move to read it. These spent the majority of their life reading sequences, while the time savings was small it added up to all the years the unit was in operation. File operations, of course, required seeking the record in a directory, but there was still a small time savings in not having to spin the drive up each time.
This made for a very noisy device, as the fan was spinning, the drive was spinning, and the head was being loaded on and off the media surface over and over (with an accompanying clunk of the head load solenoid) each time. Not something you’d want in a quiet space, but the noise of the test frames generally overrode any noise this thing made.
Really?
Kind of. I’m digging into the service manual more because it has a theory of operation. It looks like the record mode does create “files,” but not quite in the same way as file mode. More on that as I understand it.
I have to say I’m somewhat surprised that these things still come up. I figured the belts would have long turned to goo at this point, and the fact they’ve been sitting since about 2000 probably hasn’t done them any good either. They had a long life, being put into operation in the early 1980s and running up to early 2000 or so. But spin up they did, attesting to the fact they were well engineered (aka cost a lot of 1980 dollars) and designed to last for a long time.
The one in the pictures, a Model 980, is going to be the subject of an attempt to make it talk to something modern, which shouldn’t be that difficult as it speaks serial. Set your baud rate to 1200 and stand by for further posts in this series.